Monster with a Mullet: Daedon diorama in 1:20

Although many prehistoric mammals are reflected in the animals who live with us today, there were a lot of creatures whose lineages came to dead-ends a long time ago. The bear-dogs, the chalicotheres, and the brontotheres are examples of these beasts, which had their times but were then overcome by climate change, competition or some other factor that made it impossible for them to find their niche.

Daedon (which means “dreadful teeth”) was a six-foot tall, one-ton terror. Its head alone was three feet long, and outfitted with a set of teeth for crushing, cutting and nipping – including four enormous, rounded canines. The first paleontologists to discover it classified it as a swine, leading to the nickname “hell pig,” but its real parentage was with the cetancidonamorphs, which was discovered through molecular analysis of its bones. Daedon probably lived a little like a bear, with an omnivorous diet. It was equipped to kill, and it certainly did when it had a chance, but it probably got most of its protein from a more efficient method: by intimidating other predators and taking their kills. About 16 million years ago, things started to change for this bullying giant. The climate cooled and the ocean levels dropped, allowing sabre-toothed cats from South America and bear-dogs from Asia to come to North America. These animals – which were likely more social in their behavior – meant that Daedon could no longer scare predators away from their kills. And nature’s arms race meant that the prey animals now were faster and could run farther. The slow-moving Daedon just couldn’t keep up, and they became extinct. 

Paleocraft’s Daedon (sculpted by Sean Cooper) had been part of my small stash of 1:20-scale prehistoric mammals for a while. When I asked my daughter what I should build next from this collection, I expected her to ask for something cute – maybe an elephant or a rhino, or even a prehistoric otter (Megalenhydris – a six-footer from Sardinia!). No. Her current 10-year-old penchant for scary stuff led her to pick the Daedon.

Modeling-wise, it was a good choice. The kit comes in four pieces – Daedon, Daedon’s tail, a base and a resin log. The mostly-single piece body is a miracle of resin casting, featuring the ears, legs and the open mouth – with detail inside – on a single beefy piece. These are some bits of flash from what must have been a two-part mold that were easy to clean up with a sharp No. 11 blade. There was also a small plateau-like pour plug on the belly that I took off with a motor tool. Once the clean-up was done, I used an UMM scriber to replace the hair detail over the areas that had been cleaned up; the resin was soft enough that this was very easy.


All cast as a single piece? Holy cow! (Or, maybe, unholy hell-pig!)

 The tail went on easily and I blended it in with Apoxie Sculpt, which was also textured with the scribing tool. At this point care had to be taken to prevent the tail or ears from being subjected to a shock, since they were vulnerable (and would be until the model was mounted on a base). 

The tail was added with CA glue and blended in with Apoxie Sculpt. A scribing tool then restored the hair texture.

The model is designed in a running pose on a base, which is like a small hill. I decided that the model’s expression and its pose lent itself to a pursuit diorama – which led me to modifying a 1:35 zebra into a Pliohippus. I finished Daedon’s potential lunch first, then prepared a base for the two animals before returning to paint the Daedon. I thought a bison-sized animal was likely to share the same colors as a bison – with some differences. The animal first received a custom mix of African mustard and French chestnut – a Luftwaffe color and an Armeé de la Air color, blended together! The yellowish resin was useful in that I could spray light coats of the base color and have the highlight areas lighter, just thanks to the natural color of the resin.

The first coat of paint was added, capitalizing on the light color of the resin to help with highlights.

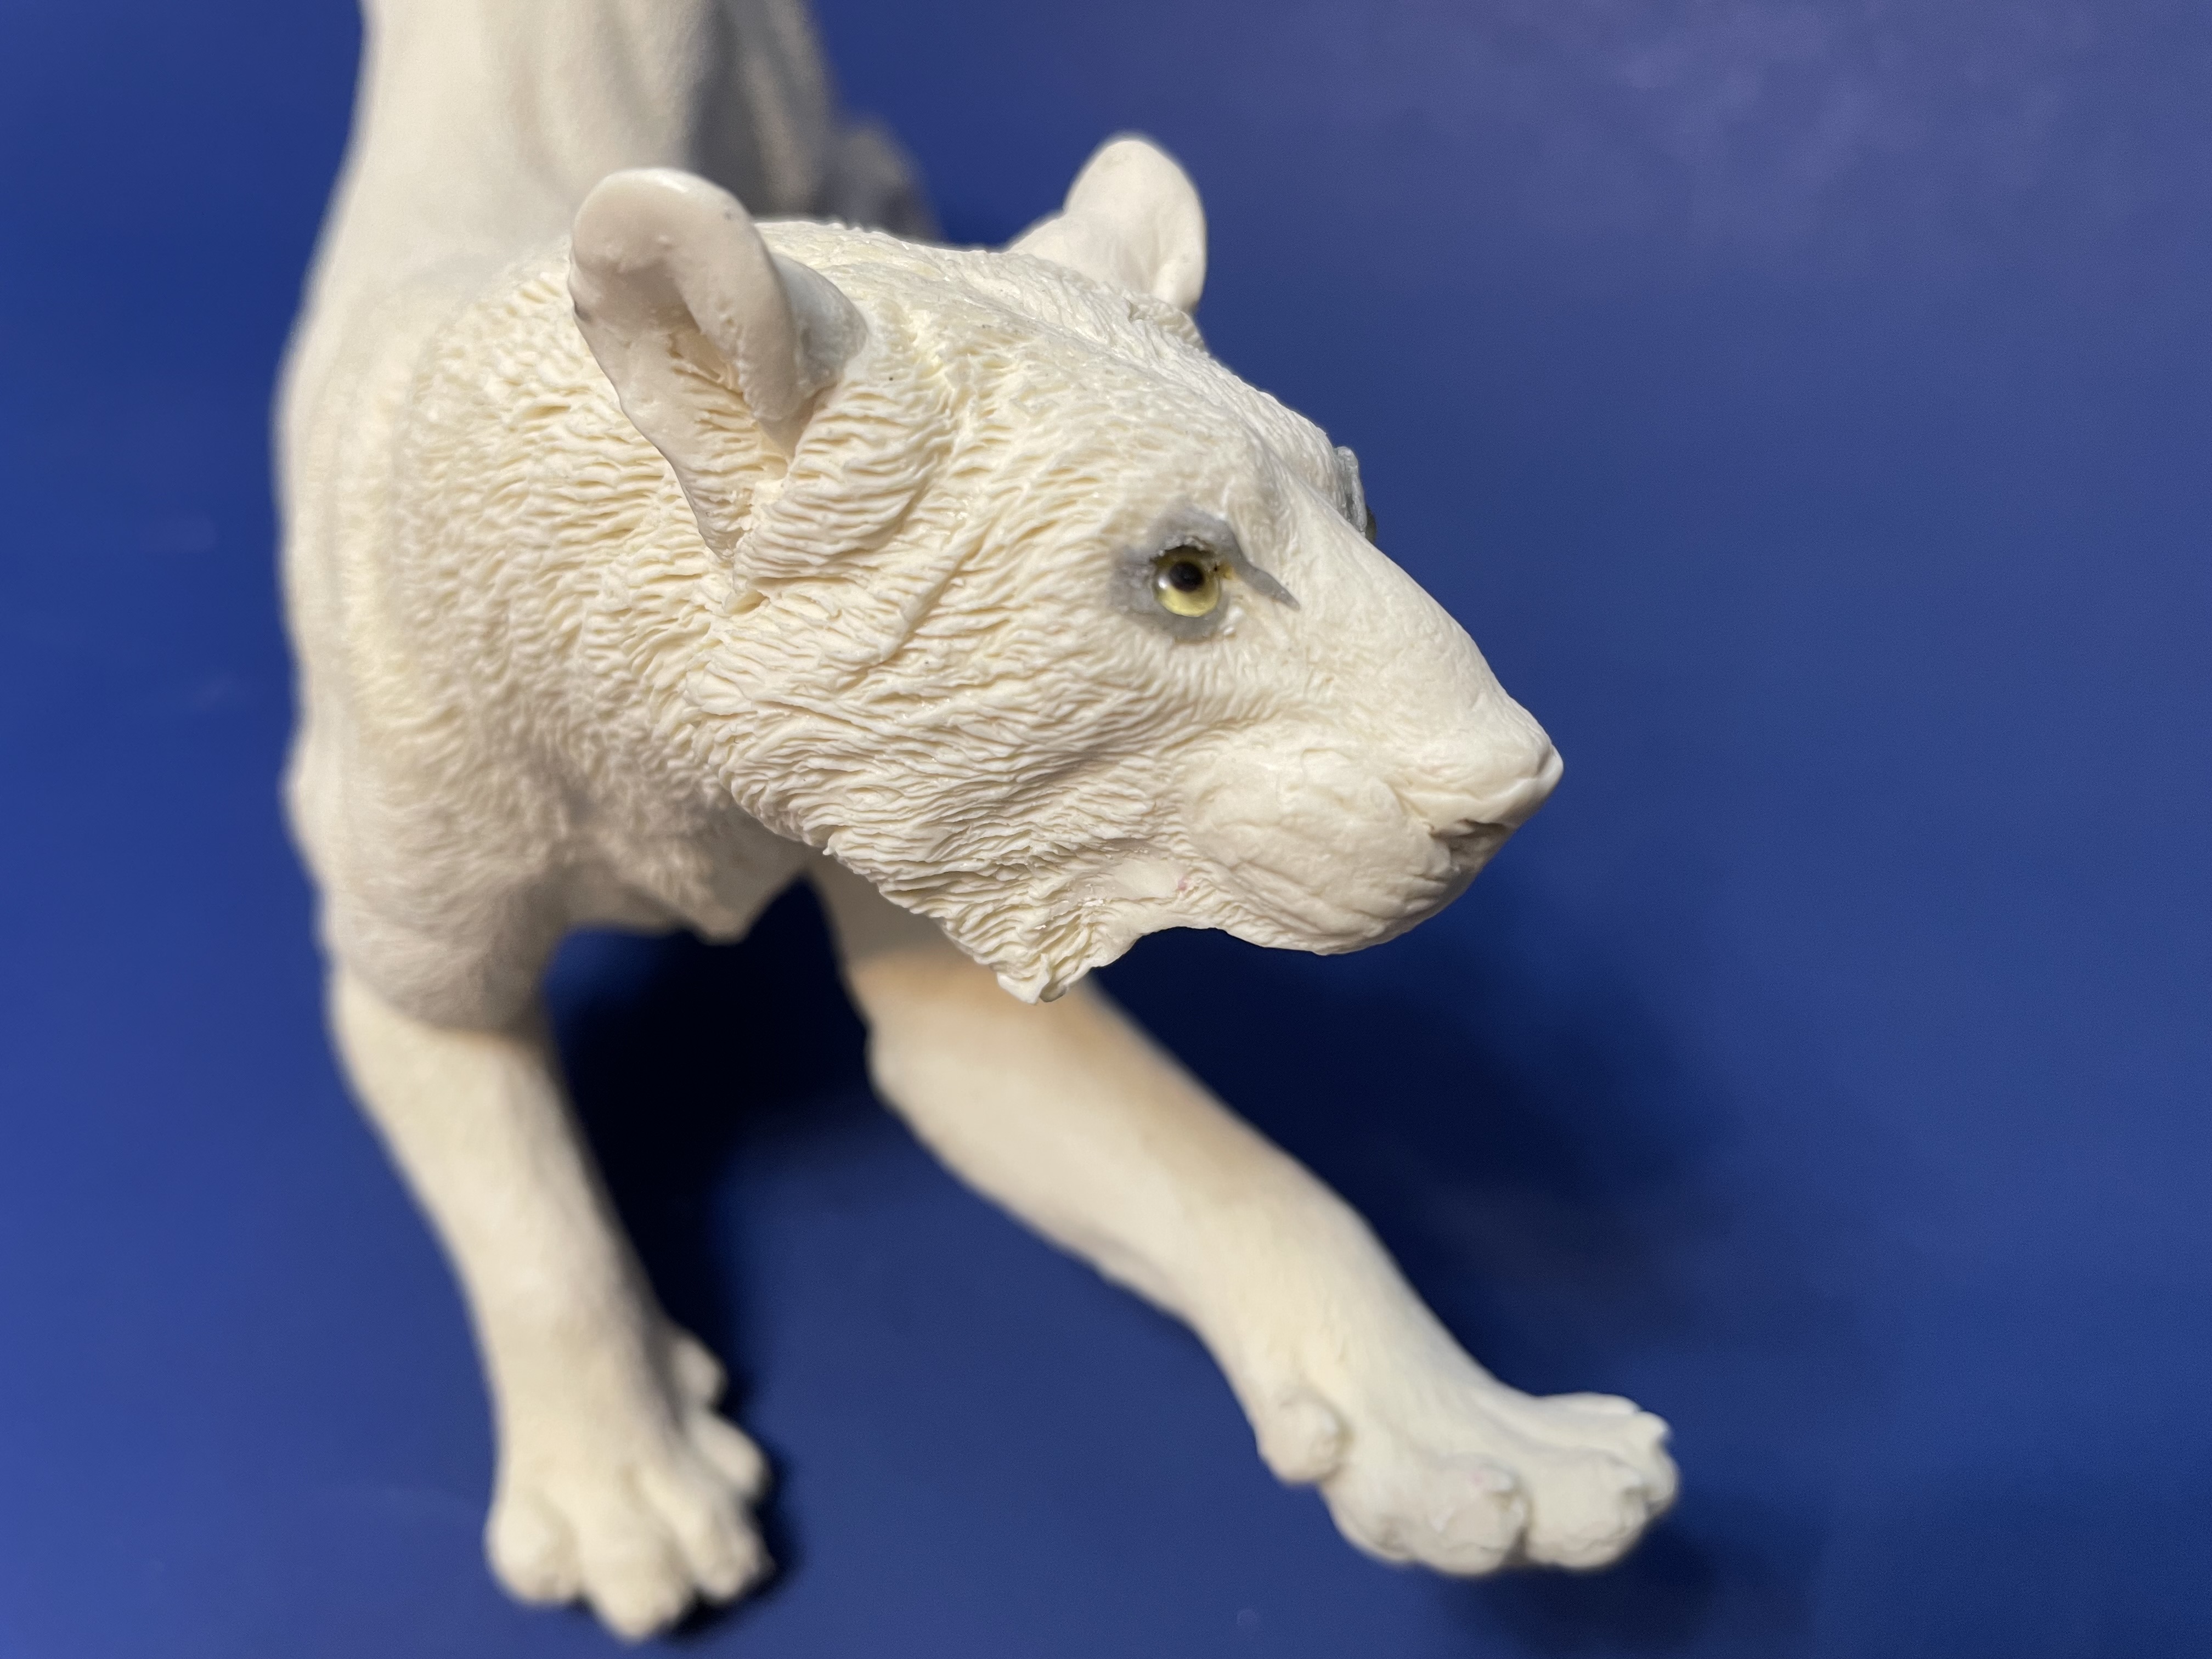
Recesses were airbrushed with a mix with more French chestnut in it. The face, with its multiple folds and lumps, was carefully outlined with shades from the airbrush. What I’ve learned is that the ideas you use in painting figures’ uniforms directly translates into painting of animals – base coats, shadow, highlights and then some dry-brushing. The very nicely defined mane on the animal’s back was painted with a slightly lightened shade of black (which also went onto the hair on the end of the tail). Airbrushing textured things required a couple of passes – there are more valleys and hollows than you initially realize, which only appear when you rotate the model and look at it from a different angle.

The black mane was airbrushed, then heavily dry-brushed to bring out the wonderful texture.

Once the black was dry, I started dry-brushing with panzer gray, then followed up with a lighter application of white. The outstanding texture jumped right out once I was done. I mixed some base color with a tiny amount of pink and painted the nose.

A little pink in the nose seemed reasonable – the omnivorous Dadeon probably spent a lot of time with its nose to the ground.

The eyes were painted white, and once that was dry I drew in the irises and pupils with Micron pens – a .05 brown pen for the irises and a black .005 pen for the pupil. Then I returned to the base color to sharpen up the eyes, and covered each of them with a tiny bit of five-minute epoxy, which added an appropriate shine. 

A close-up of the eye, all drawn on to a white background with colored pens.

The mouth was particularly challenging. I started with a mix of red, violet and white for the roof of the mouth and the gums. A tiny amount of red was added to the mix and used for the tongue. I then carefully painted each tooth with white, taking care to outline the gum lines precisely. I also took the opportunity to smooth out any rough spots on the teeth, a big pitfall on resin critters like this. To add some differentiation to the dentition, I then mixed up a Future was (50-50 Future and water, with some Payne’s gray watercolor paint mixed in) and brushed it, pinwash-style, around the teeth. (I also put some up the nose for depth and, er, a “snotty” appearance.) Reviewing the mouth, I thought the teeth were just too white. I mixed up a wash of of Future with a tiny bit of Tamiya clear orange and coated the inside of the mouth. The teeth now looked appropriately yellowed, and the entire mouth had a “wet look” that was just right. 

The last step was to paint the hooves. I mixed up a dark gray color, carefully brushed it on, and then heavily drybrushed the hooves with a lighter gray color. 

So, now I had Daedon and Pliohippus – where do I put them? I started out with a 12 inch-by-six inch board, which I stained a dark shade and treated on the border with a polyurethane gloss coat. When I was sure it was dry, I masked the border with painter’s tape and started applying AK Interactive’s Nuetral Texture for Earth, smoothing it on with a popsicle stick much as one might frost a cake. I had collected fine earth and small rock from the yard of my home, and while the AK Interactive texture was wet I added the rocks to the base, with a real effort to avoid unintentional symmetry. The human mind likes symmetry, and fights to make things even and balanced. Nature has no such hang-up. So, instead of trying to fill up the entire base with rocks, I put them mostly on one side of the base. Then, with the texture material still wet, I sprinkled on the fine dirt. Most of it stuck – I shook the rest off the next morning. 

The base after the application of the AK Interactive texture and the application of the rocks and fine earth. The dark spots are the texture still drying.

The yard dirt was a bit too dark for what I wanted, so I airbrushed the base with some British armor sand, avoiding the rocks as much as I could. I then ran a dark enamel wash around the rocks, which increased the visual contrast with the dirt. Next, I added some 6mm Silflor grass tufts, starting in places on one side of each clump of rocks (I guess we know which direction the prevailing wind blows from, don’t we?). I again tried to avoid symmetry or any non-random placement of the tufts. I used an olive color of tufts, but also used some burnt yellow and deeper green tufts here and there to mix things up. I had wanted to include some tall grasses in the mix, but I couldn’t find the bag of Woodland Scenics grass I needed for the job. Looking around the workbench, I spotted something better: a rough 55-cent brush I bought at the hardware store to apply stain to the base. The bristles were a bit thicker than the scenic grass, a little varied in their color, and the tips of some were split – so, perfect tall grass. I cut some groups of bristles from the brush, trimmed the bottom so they were even, dipped them in scenic glue, and planted them around the base, especially in the middle of the tufts. A little push on the top spread the individual bristles and made them look like clumps of weedy grass. For variety, I used some small sprigs taken from a “Super Tree” set from Scenic Express. These are from a sagebrush relative that grows above the Arctic Circle. They’re intended as the small branches for the “Super Trees,” but I just trimmed bits off a single five-inch “branch” and added them as small, dried-out bushes on the base using scenic glue as an adhesive (this is a white glue that dries to a matte finish). 

The final effect of the rocks, grass clumps, bristles and bushy sprigs – suggestive of an arid high plain.

The rear hoof of Daedon was drilled and a pin was inserted. I drilled a hole in the base to accommodate the rod from the rear foot of the Pliohippus and inserted it, turning and bending the rod so the horse was leaning to the right as if in the middle of an evasive turn. I measured Daedon in relation to the horse and drilled a hole for his pin as well, placing him so he was threatening Pliohippus but far enough away to suggest the horse had a good chance of escape. 

Run, little horsey! Run!
A view from the other side of the scene.

And that was it! The Paleocraft kit is a phenomenal starting place, and putting another animal in the scene only enhances how scary this creature would have been.  

The tail was added with CA glue and blended in with Apoxie Sculpt.

Horseplay: Converting a 3D-printed Zebra into Parahippus

We think of horses as common animals, but long before they were domesticated and became a regular part of human life the horse family was diverse and numerous. Horses of all sizes occupied a variety of ecological niches in North America, from small dog-sized horses to enormous Clydesdale-sized animals that browsed in tall trees.

An interpretation of Parahippus by Czech paleoartist Zdeněk Burian.

There were several important evolutionary waypoints among horses on their way to becoming Equus, the horses we know today. The early horses tottered around on three toes – or four in back, three in front, like the earliest member of the horse family, Hyracotherium (formerly known as eohippus). Their legs bones were designed for agility and maneuverability, which makes sense since these little horses found refuge in forests, where twisting and turning around trees was effective in shaking predators.

As the environment changed and parts of the earth became dryer, the forests retreated, grass evolved and grasslands followed. The need to twist and turn gave way to the need for speed – and as a result, horses’ bones changed. Their “extra” toes became smaller until they were merely vestigial items, the center toe became a true hoof as bones behind it fused and ligaments connecting the central toe to the fetlock gave it greater stability. The bones in the legs fused as well, eliminating flexible leg rotation and allowing the horses to move through forward-and-back strides that helped them move fast on open ground. These features first appeared in Parahippus, a meter-tall horse that lived from 22 to 17 million years ago.

Parahippus means “side horse,” which may relate to the animal’s teeth – the side branches of the posterior crest of the upper molars. Parahippus had improved teeth – the molars also had a hard covering for grinding grass, which was typically covered in high-silica dust and sand. Joseph Leidy, the paleontologist who discovered the animal, didn’t explain the name (he quit paleontology in disgust over the vicious rivalry between Othniel Marsh and Leidy’s student, Edward Drinker Cope – a rivalry worthy of its own post, or movie. That movie was nearly made in 2014 starring Steve Carrell and James Gandolfini, but Gandolfini’s untimely death scotched that production. But I digress).

Parahippus is an important animal, but it’s hardly what you’d call an example of “megafauna.” But it was probably an important prey animal for large predators – including Daedon Shoshonensis, or the “hell pig,” a buffalo-sized hippo relative that lived from 23-20 million years ago. Scientists still don’t know whether Daedon was primarily a scavenger or a predator – it was probably a bit of both, much like bears are today.

I have a Paleocraft Daedon, which is provided in a running pose with its fearsome jaws wide open and its head turned as if it’s lunging at something. The supplied base would give the Daedon a place to stand, but the animated pose suggested an interaction with another animal – potential prey, or maybe just something the ill-tempered Daedon stumbled across while patrolling the plains of Colorado 21 million years ago. That’s where Parahippus comes in.

Like I said, Parahippus isn’t one of the glamour animals of the Miocene period, so getting one required a bit of thinking. Grazing the on-line catalog of Shapeways yielded a vendor that produced African animals in a variety of poses and scales. One of their offerings was a “startled plains zebra, male.” The pose was perfect – running, with mouth open and teeth bared. That’s the same expression I’d have if I saw a Deadon! I did some computing and figured out that a meter-high Parahippus would be about two inches high in 1:20 scale. The zebra was about two inches high in 1:32 scale – I ordered it and, when it arrived, added the extra vestigial toes by adding shaped lengths of .035 styrene rod was CA glue to the feet.

The 3D-printed zebra after being “backdated” with two vestigial toes on each foot.

I also drilled a hole into the one rear foot and inserted a metal rod, which made it much easier to hold the figure while painting.

A view from slightly astern – the extra toes were bits of .035 styrene rod turned in a motor tool and CA-glued into place.

How should I paint it? A lot of paleoartists give these animals spots, mottles and stripes, but I thought a grasslands dweller would be a bit less gaudy, especially a mature animal. I primed the model white, and then airbrushed it all over with African mustard, a warm tan color. I purposefully applied less in the high areas on the back and sides; I then airbrushed a slightly darker and highly thinned color into the low spots on the neck, sides and haunches.

All the paint – except for the mane, tail, hooves, eyes and mouth – was applied by airbrush, which made shading the musculature very easy.

The belly was airbrushed white, as were the bottom of the feet. I painted the toes (and hooves) with a mix of dark gray and brown, and used dark brown to pick put the nostrils. The mane and tail were painted a very dark gray, dry-brushed to bring out the highlights and given a pinwash to enhance the detail

The mouth was painted with a mix of red, blue and white – a kind of blue-ish pink. The teeth were painted a mix of white and tan, based on my observation of teeth on live horses.

Your horse dentition reference photo of the day. Thanks to the guide back in Granby Lake for helping me out when I asked for reference shots for my models!

A pin wash helped establish a demarcation between the teeth and lips.

Biting an apple, or yelling from fright? The rest of the diorama will tell the story.

Finally, I used a .005 micron pen to color the eyes. A shot of flatcoat tied the whole animal together.

I put a lot of thought into how to get a 1:20 Parahippus, but converting and painting it took two evenings of work. Next, I need to make a base for this ancient horse and his enemy – then it’s onto Daedon!

Big Cat with a Big Appetite: Machairodus Lahayishupup in 1:20

Nine million years ago, North America was home to a startling variety of large animals – elephants, camels, horses, tapirs, ground sloths, armadillos and rhinoceros, to name the largest. And, with big plant eaters come big predators. Among those prowling the American landscape was Machairodus Lahayishupup, one of the biggest cats of them all – and one we knew little about until 2021.

Various species of Machairodus had been found and described starting in 1833 in Europe, Asia, Africa and North America over the years. Those animals were lion-sized predators, with stocky builds but narrow skulls. They had short sabre teeth and large, well-developed front legs for subduing their prey. The last members of the family are thought to have died out as recently as 10,000 years ago in Europe.

Machairodus became what is known as a “wastebasket taxon,” because various species of large cat were lumped into the family and later reclassified and removed. For example, Machairodus Catacopsis, first discovered in Kansas by the famous fossil hunter Edward Drinker Cope, later became Nimravades Catacopsis as more research exposed the more complex history of predatory cats.

In 2021, researchers completed a comparison of seven uncategorized fossil specimens against other identified Machairodus fossils collected around the world and described a new species – Machairodus Lahayishupup (in the Old Cayuse language, “Laháyis Húpup” means “ancient wild cat”). This was a truly big animal – estimated at an average weight of 600-900 pounds, more than eight feet long and four feet high at the shoulder. At that size, researchers believe it was capable of taking down prey weighing up to 6000 pounds. “This was by far the biggest cat alive at that time,” wrote Ohio State’s Jonathan Calede, who, along with John Orcutt of Gonzaga, authored the study.

The fossils the two studied were like many in museums – collected, but never fully described. Orcutt found a large upper arm bone labeled as a cat in the University of Oregon Museum of Natural and Cultural History when he was a grad student. Years of searching found other specimens across the American west in the Idaho Museum of Natural History, the University of California Museum of Paleontology and the Texas Memorial Museum.

“One of the big stories of all of this is that we ended up uncovering specimen after specimen of this giant cat in museums in western North America,” Orcutt said. “They were clearly big cats. We started with a few assumptions based on their age, in the 5 1/2 to 9 million-year-old range, and based on their size, because these things were huge.”

Orcutt and Calede developed a digital method of measuring the elbows of cats – extinct and otherwise – to model their elbows.  They discovered they could use the elbow shape to tell apart different species of modern big cats, then applied the concept to the fossil record. “These giant elbows scattered in museums all had a characteristic in common,” said Orcutt. “This told us they all belonged to the same species. Their unique shape and size told us they were also very different from everything that is already known. In other words, these bones belong to one species and that species is a new species.”

The researchers calculated estimates of the new species’ body size based on the association between humerus size and body mass in modern big cats, and speculated about the cat’s prey based on its size and animals known to have lived in the region at that time.

Machairodus Lahayishupup was likely an ambush killer, laying in wait in grasslands and forests and surprising its prey. Its build was not that of a distance runner – instead it had powerful forelegs useful in subduing startled prey, and saber teeth useful in dispatching large prey quickly. The teeth were shorter than its more famous ancestor, Smilodon, but scientists say the largest examples of the North American species of Smilodon topped out at 620 pounds, about the average weight of Machairodus Lahayispup and 300 pounds less than a large example.

This exciting back story only revealed itself to me as I prepared to work on my own 1:20 Machairodus model. Sean Cooper, the talented sculptor behind the Paleocraft Resin Models line, put out a predation scene featuring a Machairodus chasing a three-toed horse (Hipparion, I would assume). The two animals came with a base and some fallen logs, all in resin, with a total of 16 parts. Machairodus comes as a body (with legs), a tail and a separate lower jaw with the upper sabre teeth attached.

The animation of the two animals is spectacular – so much so that my first challenge was how to mount them properly. As cast, Machairodus would balance on one foot, while Hipparion perches on its back feet, leaping as if over some obstacle. My vision for the final diorama is a chase set in redwood forest in California 5 million years ago, with Hipparion leaping a fallen tree.

But, instead of biting off more than I could chew, I decided to treat the cat as a stand-alone model until I could build a base big enough and of the right shape to accommodate the entire scene. Machairodus’ first base would be an old model contest award minus its metal plate, a little smaller than the dimensions of the cat.

Supporting the big resin body on a single leg was going to require some engineering. I wanted to be able to safely place the model upright during construction, and I wanted to make sure I could remove it for transportation easily. I started by chucking a ¼-inch bit into an electric drill and (gulp!) boring a hole into the cat’s plant foot, going as deep as I dared and keeping the drill as close to centered as I could. The resulting hole was about 1¾ inches deep. Next, I used a cut-off wheel in my motor tool to cut off the top off a ¼-inch wide nail, leaving roughly 2¾ inches, and epoxied the nail into the cat’s leg, pointy side facing down.

I then drilled a hole at an angle into the base, into which the nail would slide. My first pass was at too shallow an angle – the cat was a little too flat in its posture. A second hole was at the perfect angle, so the cat’s rump and hind legs were high in the air. Hole two was close enough to the first hole that the cat’s paw hid my mistake entirely!

Next, I wanted to up my game a bit with a trick used by Ian Robertson, who builds spectacular dinosaurs and prehistoric mammals. Ian recommended a source for taxidermy glass eyes – using them is more work but the results are startlingly effective. For dinosaurs, you can use whatever eye color and pupil shape you want, but predatory cats’ eyes have a specific look. I studied dozens of photos of lions and other big cats; their eyes were usually a straw yellow color, with a round dark pupil (not “cat’s eye” shaped like our housecats have). I went on line and bought some eyes intended for mounting small birds – they’re 3mm in diameter, and nicely round, with a slightly convex back.

I mustered my courage and broke out the motor tool again. Carefully, I bored out the eyes, using an assortment of drills and a routing bit. In the process, some of the brow detail was lost – as was expected.

Using epoxy to gain some working time, I positioned the eyes so they were focused on a single point – the Hipparion, in the final display.  The first eye went in with little difficulty; the second one took work two align the pupils. The last thing I wanted was a cockeyed cat, and I looked at the model from multiple angles and adjusted the eye accordingly to get the look I wanted.

Before I started drilling, I took a photo of the eyebrows with my phone’s camera. This helped me rebuild this detail using Apoxie Sculpt, which was also useful in hiding the edges of the glass eyes. The Apoxie Sculpt was contoured with a toothpick and other similarly complex tools to restore the hair pattern sculpted into the model.

With this detail added, I turned to the jaw. The top of the animal’s mount had a big round indentation in it, so I first added a palette with Apoxie Sculpt, even adding the little ridges across it. The model had no top front teeth, so I made some out of styrene rod, turned in my motor tool and sharpened with sandpaper. These were cut off and pushed into the still-pliable Apoxie Sculpt. After studying several convenient animals, I mixed up a reddish-lavender shade and painted the mouth, followed by the gums in black and the teeth in an ivory shade. This was repeated with the separate jaw, which was added to the body. What little seams remained was filled by Apoxie Sculpt and the fur pattern was restored.

I saved the tail for last, since I figured it would be the easiest to break off. It fit reasonably cleanly, but I drilled holes for a bit of stiff wire to reinforce the joint. The tail was CA-glued in place, and Apoxie Sculpt again was used to blend the joints away.

I now had a complete but unpainted Machairodus. How would I finish it? Artists’ depictions show it striped like a tiger or spotted like a leopard, but I drew on personal experience. Our orange tabby Nemo was virtually invisible when he would hide in the tall grass or in the shadows of our garden – his camouflage made him a perfect ambush predator. I’d use Nemo as a model for the big cat’s color scheme!

I added small balls of Silly Putty to mask the eyes, then primed the model using True North’s excellent flat white enamel, which also provided the white belly and facial markings. The red color is really Africa mustard from True North, mixed with small amounts of red and burnt sienna. This base color was carefully applied to create the stripes on the sides, tail and limbs. I then adjusted the base color to accentuate the model’s musculature, using the airbrush to carefully add highlights and shadows. The model is big – there was no need to over-accentuate the folds or make the highlights too white. The one trick was to keep the model the right shade of “red” – too much and the cat would look pink, and too little made it look tan.

With the basic colors on, I used a brush to apply the markings to the face, again copying my own cat where I could. I used the nose of a mountain lion as the basis for my model’s nose, and carefully added black around the eyes to simulate the coloration on real cats. With a very fine brush and thin paint, I added faint lines to the muzzle in the area from where the whiskers emerge, and drybrushed the inside of the ears with the base color lightened with pale pink.

I looked at a number of websites to learn what color the pads of a lion’s paws are – I settled on a mix of earth brown with a drop of red. After painting the pads on the three exposed feet, I scrubbed some brown pastels into them to kill any shine and add a bit of… weathering, I guess you’d call it!

The base was coated with scenic glue, sprinkled with dirt, and then given some small tufts of vegetation – nothing spectacular since someday the cat would be transferred to a new base.

The nail in the foot went into the hole in the base – perfect! All was complete. Except there was something missing –a cat with no whiskers looks weird. The best thing for tapered whiskers would be real whiskers, trimmed to length. By my model, Nemo, only dropped one and I was not about to trim the ones still on his face. Luckily, my friend Tom Gaj has collected whiskers from his cats over the years and he sent me a bag full of them! I used a fine .080 drill bit to open holes in the muzzle – just eight on each side – and then CA-glued the trimmed whiskers into place. So the model was completed, with the assistance of Nemo, Barney, Bailey, Tigger, Callie, Molly, Nikki, Tootsie, Genny, Leo and Bella.

The amazing sculpting of this model – and the quality casting – means that modelers are a long way to success even before they start assembling it. If you can overcome the engineering challenge in posing the model and have a bit of skill with Apoxie Sculpt and blending textures, it allows you to quickly get to fun things like painting and detailing.