The left side of the Ventura interior – ready to be joined with the right side.
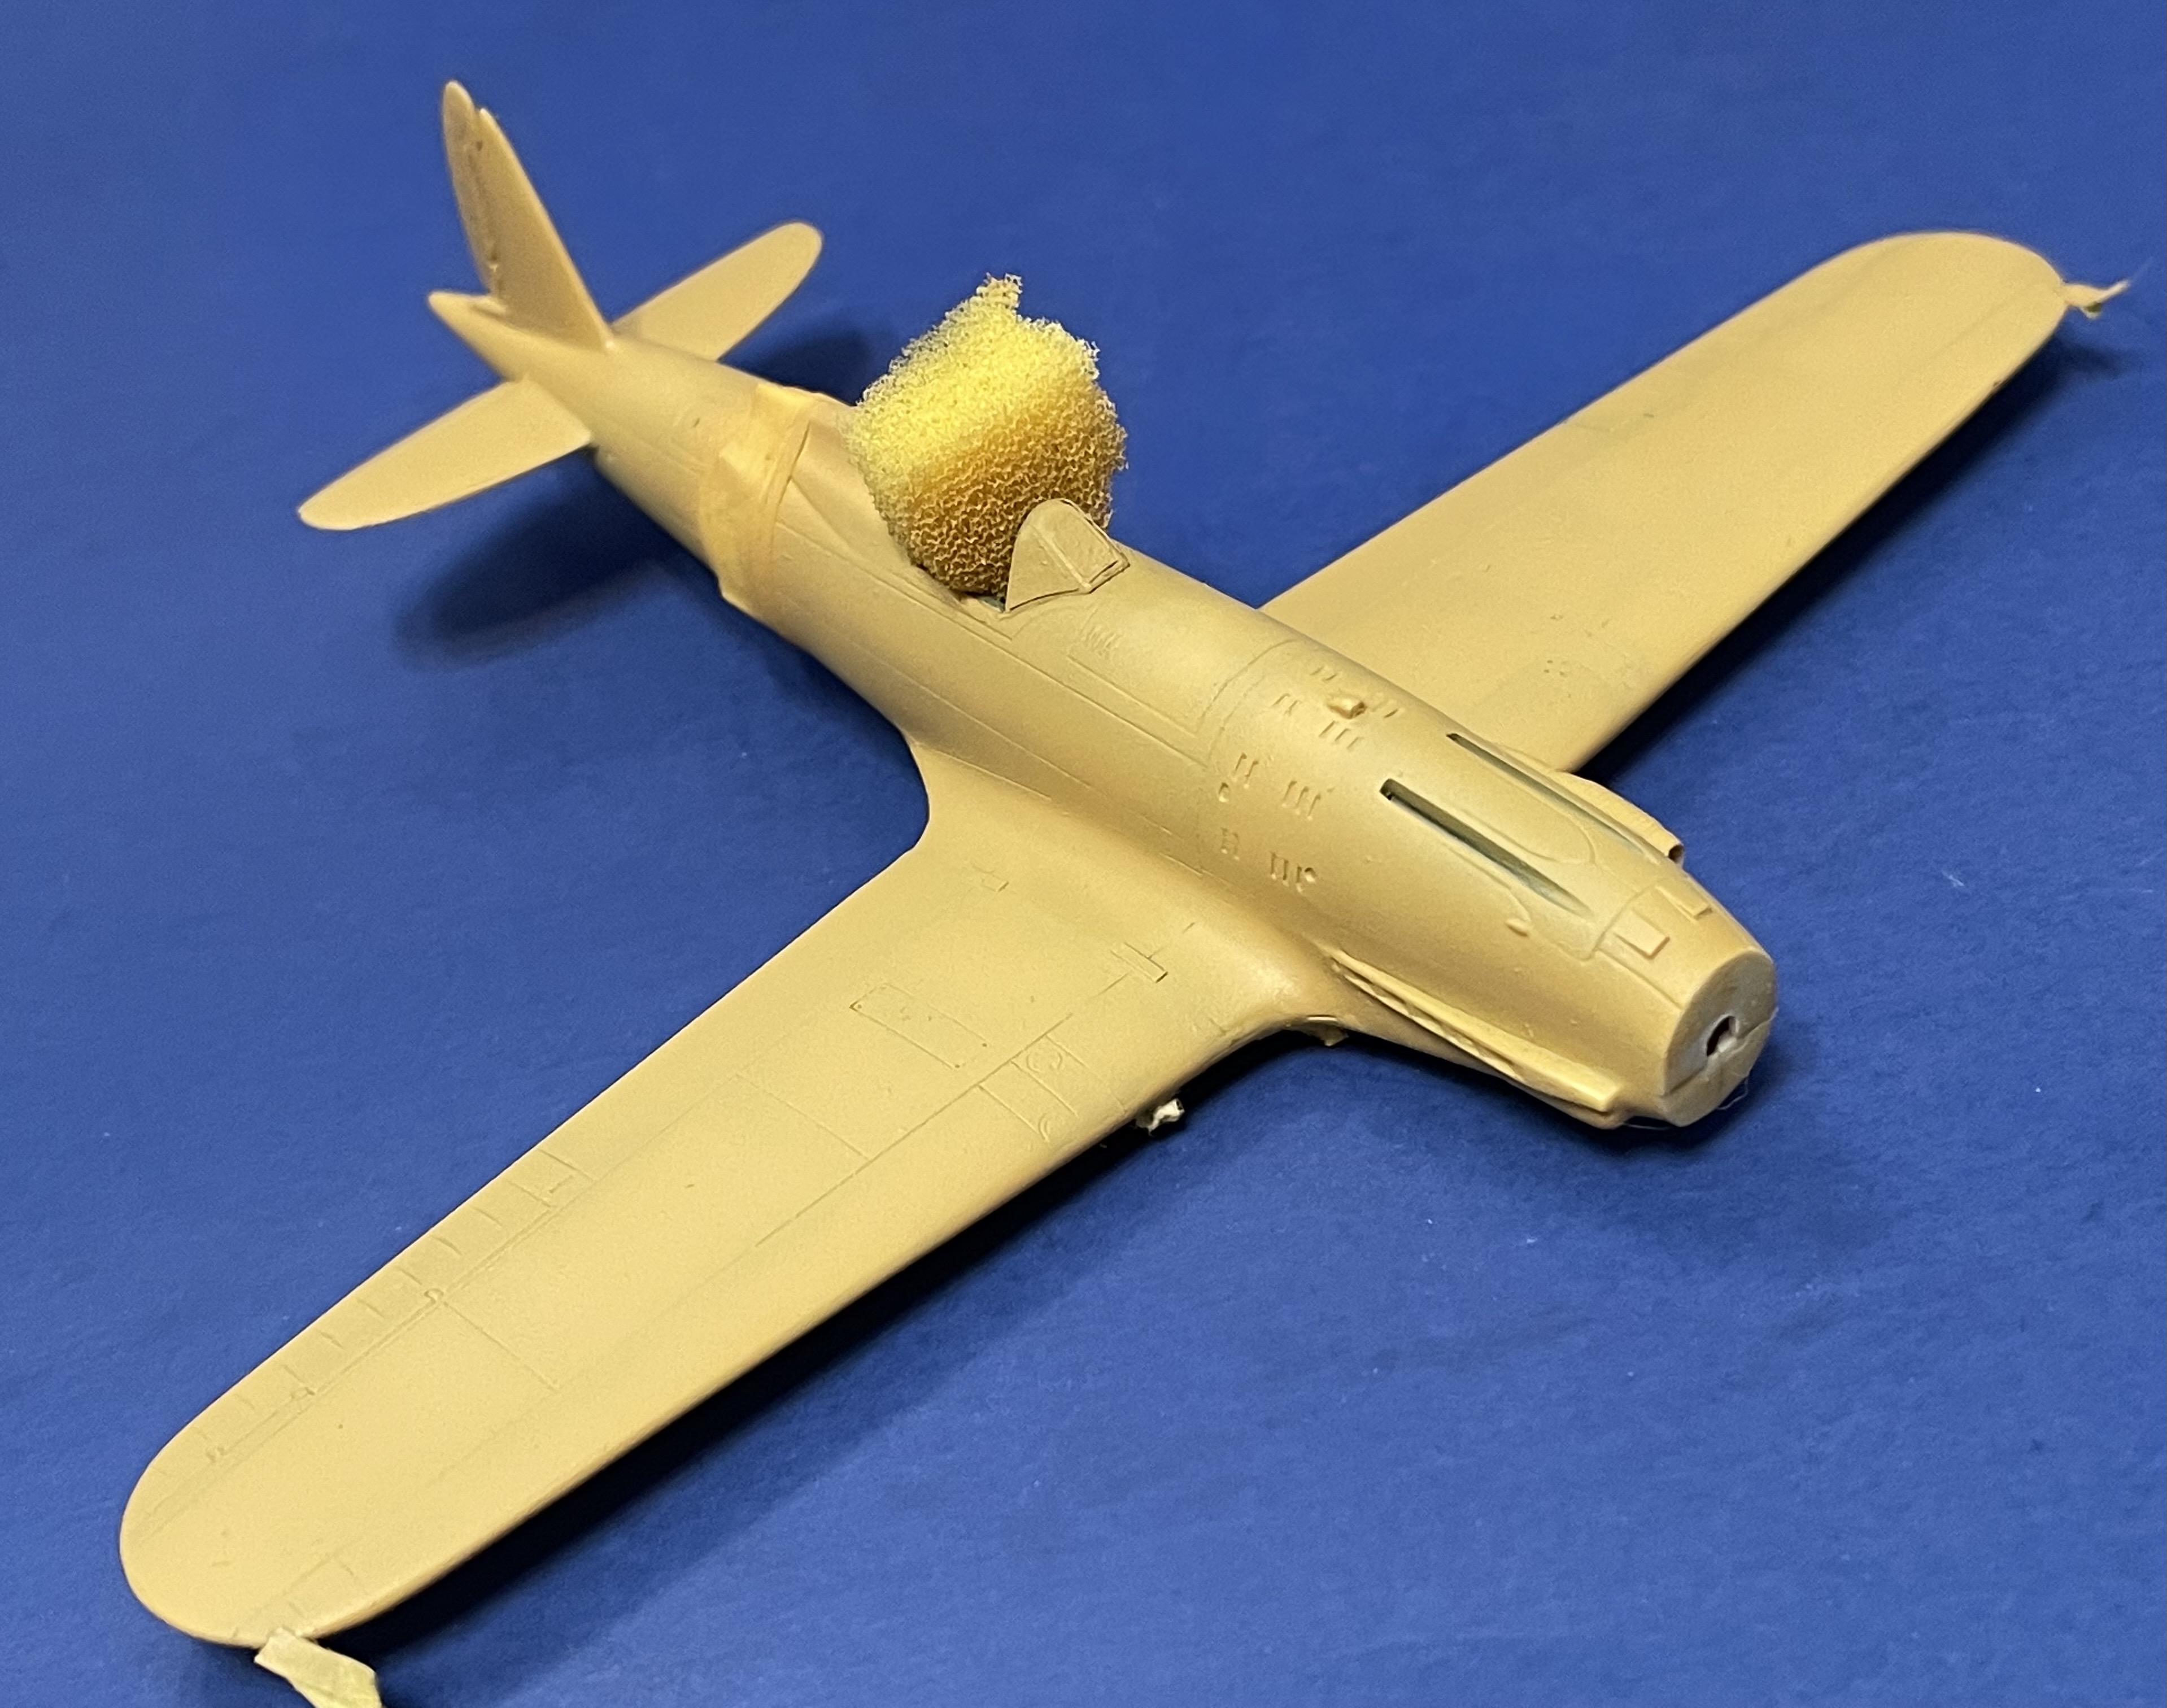
I was now in the home stretch when it came to the fuselage of the PV-1. I have to admit – I was a bit sad to think I’d be closing it up soon after all the work I’d done! Before I added the cameras in the back – which I thought would be quite vulnerable during construction – I detailed the radio compartment with the appropriate gear from Pavla and its associated wiring. I also made an adjustable lamp to match my references – actually, I made three, knowing they’d come in handy. I sanded the end of a length of .030 styrene rod and drilled it down the center with a No. 80 bit, then cut it off and added a bent length of stiff wire. The wire was anchored to a “base” made from a square of .020 styrene, and the whole thing was painted black. Added to the top of the compartment, it’s a relatively easy to see detail.
The lamps in the radio and navigation compartment – easy to make and fairly easy to see though the small windows in the fuselage.
I also made the radio operator’s desk from a small rectangle of .020 styrene, painted in a streaky manner with Testors acrylic tan to simulate wood. A bit of .040 styrene rod with a small rectangle of .005 styrene for a pull handle formed the drawer below the desk. A similar but larger desk was made for the navigator and added aft of the radio compartment bulkhead; I used a .020 styrene rod to support the free corner of this desk.
An overhead view of the navigator’s station, with his seat in place and his flight computer on the right side of the desk.
I made a small log book for the radio operator our of a rectangle of .030 styrene for the pages. I CA-glued blue paper around the styrene and cut it off to create a “cover,” then added it to the desk. ell.
The navigator’s station received a lamp, and a compass made from styrene rod and strategically drilled out was installed on the desk’s corner based on reference photos. The airspeed/altitude indicator was made with Reheat photoetched parts and styrene strip, as was a map cabinet and a sextant case. The navigator’s flight computer was made out of .005 styrene, and I made a set of headphones with slices of styrene rod, some bent wire and a length of fine lead wire.
An overall view or the navigator and radioman’s stations. Notice the can of condensed milk on the radioman’s desk.
Since I was done using my airbrush on the interior, I though this was a good time to add the five small windows to the fuselage. The kit windows were comically thick, so I swapped in some. 020 butyrate sheet, carefully cut to size. When these were precisely cut, I wedged them in the openings and ran thin CA around the perimeter to seal them in place. Then, I sanded with progressively finer flexible files, finally polishing the plastic to a high shine, followed by buffing with Blue Magic auto polish. I used a cotton swab to polish up the interior as well, which removed any fogging from the CA glue. Four of the windows went in with little fuss, but the radio compartment window fought back with a vengeance and took about eight attempts to get right!
It’s always fun to paint up the seats – in this case, there were four in the Pavla set, each unique. They had molded-in belts, but they weren’t particularly nice – I replaced them with extra Eduard belts from my B-26 project, applying them right over the molded-on belts. I also scratch-built a fifth seat for the navigator’s station, which wasn’t in the set. I routed out the seat pan with an engraving bit in my motor tool, then added a seat back from styrene and drilled the bottom to accept a support. The Eduard belts went in place next.
The navigator’s seat was scratch-built and has 12 pieces, including the seat belts. Will anyone every notice it in the closed fuselage? Probably not!
The navigator’s seat was mounted on a rail to allow it to move in and out from the desk; I made the rails from .010 by .020 rod, and cut two lengths of .010 styrene to create the X-shaped base that attached to the rail. A .035 styrene rod went in the center of the “X” and the seat mounted on this post.
The seats were all CA-glued into place – except for the seat next to the pilot, which was often occupied by the navigator. This was a removable seat with a canvas back; what I didn’t know was whether it had seat belts or not. While waiting for conformation, I made the frame for the aft cameras from .035 and .020 styrene. The main framework was assembled with liquid styrene cement to get a true mating of the tubes. The cameras were mounted as in the photos, and I exercised care to ensure the were pointing out a window pane and not into a frame. Checking with the clear part for the ventral gun position ensured the cameras lined up – and didn’t interfere when the clear part was added.
The three K56 cameras shooting through the ventral position, carefully arranged on a scratch-built rack made from .020 styrene rod.
Next, the control panel and central pedestal was added, taking care to leave a very small gap at the front. This would be obscured by wiring and a chronograph later. Next came the addition of the throttle, mixture and other levers to the central pedestal starting with the landing gear retraction lever and working out from the center. The handles were made from .2mm metal rod cut to size and added using white scenic glue, which allows time to adjust their positions. Once they were dry, a small bead of white glue was added to the tops of the levers, which were carefully painted black. The glue “knobs” were then painted the appropriate colors with a toothpick.
The seats, control columns and and throttle/mixture levers in place. Barely visible is one of the pilot’s rudder pedals – it was taken from a spare P-51 photo etched set!
I added the seats where they belonged, including the jump seat. I found a photo that seemed to include a belt on its margins, and that was good enough for me – logic suggested you’d want your navigator stuck to that seat in the event of evasive maneuvers. It was given some extra belts and stuck in place with CA glue. I made up the control columns next; the Pavla set had both pedestals, but one of the wheels was missing. I made my own from .2mm lead wire and styrene – I think mine looks better, although they’re very close in appearance. I painted the wheels green with white wraps on the wheel to approximate photos.
The navigator’s back-up control column was added on a small length of styrene rod to replicate the real thing.
While the cockpit parts were drying, I assembled the wings. The fit of the nacelles was rather bad, and I planned on removing part of them anyway to add the Plus Models nacelles and cowlings, anyway. I glued the wings together, then added a guard to the trailing edge of the wing made from an index card – the flap guides seemed very vulnerable, and a little precaution here could save a lot of time later. It took a couple of sessions with CA glue and flexible files to clean up the leading and trailing-edge seams.
To avoid breaking off the flap guides, I made a protective sleeve out of an index card.
I also sourced new R-2800s – or, really, some old ones. The engines I had on standby for my B-26 project worked great after a little repair. After almost a decade, the loose engines had lost a pushrod or two and one was missing the return pump, which I scratch-built. I ordered replacements – the B-26 will not go engineless for long!
Two Quickboost R-2800s, outfitted with photoetched ignition harnesses, a lead wire central ignition ring, and black stretched sprue push-rods – perfect for the PV-1.
After a brief hiatus (I had to keep adding the wing to my DH.2 build – and knocking it off, three times!) I spent a little time getting some small details right on the Arma P-51C. The scoop on the radiator intake went on with little trouble – it fit as well as any 1:72 kit scoop fits, which is to say I did a little filling and sanding in this complex area, where curves and tight spaces can make things challenging. I added a brace inside the intake to replicate the item in the real thing.
Next, I drilled a tiny hole in the vertical fin (which itself is extremely narrow) and added a bit of stiff wire to serve as the anchor for the aerial. I also drilled a hole into the insulator molded on the top of the fuselage and added another bit of stiff wire for the aerial to anchor to later (it’s much more fun doing this now than at the very end of the build with a painted model and lots of things to knock off). I also added a bit of wire from the aerial entry point along the top of the inside of the radio compartment. I did it figuring no one would ever see it, but Arma’s clear parts proved me wrong!
Nothing is more terrifying than trying to center a tin No. 80 drill bit on a molded-in insulator – note the tiny hole just aft of the light atop the fuselage.
Speaking of the clear parts, I cut all the parts I planned on using – the quarterlight panels, the windscreen and the two halves of the open “birdcage” canopy – and cleaned up the sprue attachments. After I dipped them in Future and let them dry, I ran a black Sharpie along their edges – not only does it help obscure any visible glue marks once the part’s attached, it makes the clear parts easier to see while you’re handling them. The quarterlight panels fit quite well, and the radio compartment was very visible.
All that detail that people joke will never be seen? I can see it through Arma’s very clear transparencies!
Next, I prepared to add the windscreen by getting the gunsight in place. The kit’s gunsight is very nice and appropriately tiny, so of course I dropped it and it disappeared. In its place I used a N-3A sight from Quickboost – they sell them (and other widely used sights) is a package of eight, and they’re molded with the right mount for the P-51B. I put the sight in place and painted it black, then dry-brushed it and painted the crash pad a leather color. The reflector from the set was added with white glue (after, again, outlining the reflector glass with a Sharpie)
The Quickboost gunsight is a nice representation of the N-3A sight, and the mount is correct for the P-51C.
Before I had a chance to break the gunsight, I added with windscreen. It did not fit perfectly – I had to sand out a step between the front cowling and the windscreen part, losing some of the nice panel line detail. It cleaned up quickly enough with the aid of an assortment of sanding sticks. Once it was in good shape, I set about adding the backup ring-and-bead sight, which was mounted to the inside of the windscreen. The part was scrounged from a Reheat photoetched sheet; I mounted it using white glue and tweezers. It captured the look of the real thing well enough.
The gunsight in a restored P-51B – note the ring -and-bead sight hanging from the inside canopy frame.
Before I started the re-scribing process again, I started pondering the landing light in the left wing. I found a photo of this – which took some doing! – and saw it was a very visible bulb under a large cover. I simulated the bulb with one of my few remaining MV lenses, but the kit’s clear cover wouldn’t fit with the bulb on place. Instead, I laid a strip of Duck brand clear packing tape over the light panel and cut it off at the panel lines, and removed any residue with Goo Gone sticker lifter. The final result was a clear cover with the light plainly visible inside.
The finished tape light cover. The tape looks much thicker here than it is in reality. This part of the wing was painted, so I’ll mask the lens and paint over the tape to create a slightly raised “panel.”
At her baby shower, one of my wife’s hipster friends gave her a big, lovely book – an annotated and illustrated complete collection of fairy tales from the Brothers Grimm. My daughter, being a little on the macabre side, loved these bedtime stories, which were always slightly darker than the Disney interpretations (to say the least). For example, the original version of Cinderella sees the evil stepsisters mutilate their own feet to try to get them to fit the lost slipper. Then, while attending the wedding, the stepsisters have their eyes pecked out by angry doves. Yikes!
Makes Eli Roth and Wes Craven seem like Mr. Rogers and Captain Kangaroo.
One of the stories in the book that was never adapted into a cartoon was the story of the Seven Swabians. Swabia is a region in the southwest of Germany, and other Germans jokingly consider its residents to be bumpkins – thus, the tale is basically a zinger toward the people of Swabia. Even though it’s a joke, it still ends up with its main characters dead.
The seven Swabians are walking the land (“like Caine in Kung Fu,” as Jules Winnfield would say), but being somewhat fearful and completely dim, they arm themselves with a single, very long lance. The seven are first startled by a hornet, which they mistake for war drums, and panic – as they run away, one of them actually steps on a rake (how do you say “D’oh!” in German?). They men confer and make a pact to keep their cowardice a secret among themselves. Later, they’re confronted by a hare, which they mistake for a dragon, and they attack it with their lance. Of course, the hare runs away, but the Swabians take this as evidence of their bravery.
Eventually, the Swabians come to the river Moselle. Not knowing how to cross the river, they yell to a man on the opposite shore who can’t hear them and, in the dialect of the region, asks, “Wat? Wat?” The Swabians think he’s yelling “wate,” or “wade” in English. The seven Swabians attempt to wade across the Moselle and, since this is Grimm fairy tale, they all drown. And no one lives happily ever after.
This cheery tale of misplaced bravado seems a little incongruous to go on the side of a German warplane in 1918. After all, the previous four years had seen hundreds of thousands of naïve youth march into battle full of enthusiasm and a confidence born of ignorance, only to be cut down mercilessly by the machinery of war. But that was the subject Gefrieter Wilhelm Scheutzel chose to adorn the sides of his Fokker D.VII, built by Ostdeutschen Albatros Werken (OAW) as 4649/18. Scheutzel flew with Jasta 65 from July 18 until the end of the war in November, scoring one victory, a DH.4 on August 13. He was wounded in combat on October 10 over Tichémont, France, and recuperated in hospital until October 18. His machine wore a long cartoon depiction of the Swabians attacking the hare on each side of its fuselage. Was Scheutzel depicting the enemy as the hare – something not as scary as a dragon – or were the Swabians representing Scheutzel and his comrades, fearful and yet filled with a foolish courage and fighting for something that would obviously amount to nothing?
The real plane – note the seven figures plus terrifying bunny
Scheutzel’s plane is probably the most frequently built non-ace Fokker D.VII, but the literary connection to my daughter’s storybook – and Scheutzel’s seeming Catch-22-like statement on the war – made it a must for my collection.
Years ago, I built a Fokker D.VIIF for a friend, and I tried to build a Fokker D.VII (OAW) in tandem. I’d started with a pair of Roden kits and some Part photoetched sheets, and I had the two going in unison until the propellers, interior and engines were done. Since I needed to deliver the model across country on a specific date, I shelved the OAW and finished the –F. Fast forward a couple of years and Eduard issues its own 1:72 Fokker D.VIIs. Having suffered through the indifferent fit of the Roden kits, I decided to take some of my usable parts from the Roden build and use them to kick-start the Eduard kit.
The Roden Fokker D.VIIIF – my first attempt at this subject, from 2014.
Eduard’s D.VII is a very good kit, with a notably good fit of the parts and a general crispness all the way around. I was able to use the painted and detailed cockpit floor from the earlier build, which I had painted with acrylic beige paint and then streaked with a red-brown enamel. I glued this to the Eduard floor section, then added the rudder pedals and floor-mounted compass.
The Eduard seat is a thing of beauty, with a cushion that comes complete with the recessed buttons. I spent a lot of time painting the cushion, and then added the seat belts, which obscured the cushion completely!
Interior parts for the Fokker D.VII (OAW), including the part floor added the Eduard floor. The seat is terrific!
On OAW machines, the lozenge fabric used to cover the fuselage was visible in the interior and on the panel behind the pilot’s seat. Eduard provides this as a decal – a very useful touch. The molded-on hand air pump and the throttle were removed from the fuselage sides, as were some fuselage structure, before the decals went on, since the kit provides these details as photoetched parts. I then oversprayed the decals with a thinned mix of gray paint to simulate the back of the fabric. The seat was mounted on the rear panel, the seat braces were added, and the rear panel went on the floor.
Toned-down interior fabric, vs. full-strength fabric.
The instrument panel was a set of pre-painted photoetched parts. While I considered using my earlier panel, it couldn’t match Eduard’s item. I was also going to use the Roden engine, which is actually better than Eduard’s. However, I knew from my previous build that, unless you left off the engine cowling panels, the engine was mostly invisible, so I used the better-fitting Eduard engine. The overhead camshaft and valve gear rockers are the just fine – and they’re the only part of the engine that’s easily seen on the finished model.
Your last chance to see most of the BMW IIIa engine. The details at the front and rear of the engine will be added after painting.
The kit does not provide the hand air pump for pressurizing the fuel tank, but it does provide a photoetched handle. I made the pump from a length of brass tubing from Albion Alloys. I decided to use the Part photoetched cockpit structure – it’s meant to fit the entire length of the Roden kit, but I was able to trim out just the section that would be visible and added it to the Eduard fuselage. The engine and firewall, instrument panel and ammunition tray, and cockpit floor and seat were added the right side of the cockpit, and I sneaked the throttle/mixture assembly into place on the photoetched framework before I closed the fuselage. Some gentle coercing of the interior parts was needed to get the fuselage shut – but shut it did!
A little seam work was needed – mostly because of my own efforts at detailing.
After the fact, I painted Eduard’s excellent control column, to which I added the wiring for the gun firing button and hand throttle. This was added, “Operation”-style, with pointed tweezers and CA glue.
The view from above – note the control column, with the wiring barely visible. The tachometer will go in the round fitting at center.
That’s where I took a pause – wings, tail and paint are next!
The Hiller Museum in San Carlos, California has a host of real aircraft in its relatively small but impressive building. Naturally, that means smaller aircraft – besides the somewhat large HU-16 Albatross, you’ll see pioneering gliders and biplanes, several Hiller helicopters, and some research craft. Suspended from the ceiling is one of the more interesting from that last category.
The Ames-Dryden AD-1 was used to explore the logical extension of the variable-geometry wing concept. We know that swept-back wings allow higher performance, as do swept-forward wings. By the early 1970s several aircraft (F-111, F-14, Tornado, MiG-23) employed variable geometry “swing” wings to expand their performance envelopes, offering better lift hand handling at slow speeds but reduced drag and efficiency at higher speeds. But the mechanisms required to sweep wings back imposed a weight penalty. Combat aircraft overcame that through power, but commercial planes did not have that luxury for economic reasons. That equipment also impinged on fuselage spaces, so it would be a hindrance to a transport aircraft.
NASA aeronautical engineer Robert T. Jones speculated that a solution could come in the form of an oblique wing – that is, a solid wing that pivoted so that the wing was swept forward on one side and swept back on the other side. Analysis of the idea and wind-tunnel studies suggested that such an arrangement for a supersonic transport could double the fuel economy over a conventional wing arrangement.
To study this “scissor wing” concept, NASA first built a remote-controlled propeller-driven model, first flown at the Dryden Flight Research Center at Edwards Air Force Base in 1976 Data from this remotely-piloted vehicle led to the design of a jet-powered manned aircraft, the AD-1.
The design of the AD-1 was based on a geometric configuration for a supersonic transport developed by Boeing. But, thanks to budget limitations, NASA passed these notes to a renegade aircraft designer named Burt Rutan. Without even a formal proposal, Rutan and George Mead created a feasibility study in just 40 hours. The aircraft would be 14 percent the size of Boeing’s plane and make a few concessions to pilot visibility and center of gravity concerns that would not have been issues in the full-size transport. The engines of this aircraft would be two Microturbo TRS-18 turbojets, each generating a whopping 220 pounds of thrust. Much of the aircraft would be constructed from two layers of Fiberglas sandwiched around a foam core.
With a design study complete, Rutan sent a set of cost estimates to NASA:
Preliminary design study: $560
Initial Design: $9,970
Design Modification: $4,590
Aircraft Fabrication: $218,000
Fabrication Contract Modification: $21,930
Delivery: $6,300
Total: $261,350
Rutan remembered that the stated final cost was so low that several NASA personnel thought they were approving the construction of a remotely-piloted vehicle.
At the time, the Rutan Aircraft Factory only had three employees. NASA’s contract had a contingency that limited the number of employees that would have to be hired to fulfill a NASA contract, so Rutan was ineligible. Instead, Rutan recruited Herb Iverson – his partner in a new enterprise called Scale Composites – to have his company Ames Industrial Corporation respond to the RFP. Rutan would provide the expertise in Fiberglas construction, while Ames would provide the majority of the manpower. The Ames (Industrial Corp., not Ames Research)-Dryden AD-1 was delivered to NASA on March 11, 1979.
After completion of static load and vibration studies, the AD-1 gradually eased into its flight test regimen, with the two first flights on Dec. 21, 1979. Tom McMurtry, the test pilot, had the AD-1 airborne for a combined five-minute span on the first flight, then took it to 10,000 feet and 140 knots on the second flight. The program’s objectives were to assess the handling and flying qualities of the oblique wing aircraft, to verify the aeroelastic design of the wing, and to compare the vehicle’s aerodynamic characteristics with predictions.
McMurtry, who flew the A-3 in the Navy and later the U-2 for Lockheed, piloted 49 of the AD-1’s flights. Fitzhugh “Fitz” Fulton (a veteran of the Berlin Airlift and the Korean War and a test pilot whose log book included 200 types, including the XB-70, B-58 and YF-12) flew 15 more legs. The 15 remaining flights were each flown by different “guest” pilots, including the legendary Bill Dana.
At altitude and increasing degrees of sweep, the aircraft experienced very low damping in the wing structure. Modifications to the control systems gradually improved performance. By July 1981, the plane was exploring the 50- to 60-degree sweep envelope, and was even experimenting with landings with 15-, 30- and 45-degree sweeps. By Oct. 8, 1981, the test program had been concluded, and the “guest pilot” program was initiated.
The aircraft’s final eight flights were undertaken by McMurtry at Oshkosh Airventure between July 31 and August 7, 1982, demonstrating the odd aircraft for 600,000 spectators at the enormous airshow.
The program found that any future oblique wing aircraft would benefit from a stiffer wing made from the then-new carbon fiber instead of Fiberglas and rigid foam. Increasing angle of attack created a sideways force that required sideslip or banking. At or below 30 degrees of sweep, the plane’s handling was fine, but it began to degrade slightly above 30 degrees and became more serious above 45 degrees. These were issues that would have been easily solvable through fly-by-wire technology, and NASA conducted preliminary studies for a supersonic testbed built using an F-8 Crusader. The AD-1 was slated to be modified into a “joined wing” aircraft, with a fixed swept main wing and an extended horizontal stabilizer swept forward to join to the main wing, but this project was cancelled in light of safety and budget concerns in 1989. Eventually, the AD-1 made its way back to NASA Ames Research in Mountain View, California, where it was placed on display in the open on a lawn.
That’s where I first encountered it. I had a job interview with Raytheon to edit a NASA science magazine they were contracted to produce. The interview was a mess – “you’re a journalist, but this is a magazine,” the interviewer said several times, apparently thinking the two things require vastly different skills. I was trudging back to my car, muttering to myself, when I tripped over something – it was the wing of the AD-1, which was so low to the ground that I hadn’t seen it!
After a few years, the AD-1 was moved to the Hiller Museum in San Carlos, where it was hoisted into the rafters (perhaps to spare the shins of museum visitors!). It’s there now; you can see it easily from a raised observation area, and the workmanship in the aircraft is impeccable. You’d never guess the exterior was made using the same techniques as a surf board!
In 2004, my friend David Newman created a 1:72 kit of the AD-1 for his company, Muroc Models. The kit was small – just like the real thing – and the box sat on top of my modeling desk for years. When the news of Dave’s passing reached me, I thought it was only right that I build this wonderful little model as a tribute to him.
The kit has very few parts: a fuselage, with an integral cockpit; one-piece tail; lower fuselage, engines and pylons, landing gear, three wheels, the wing, control panel, control column, and a one-piece vacuformed canopy. That’s 12 parts to the basic model. On top of that, the kit provides two small decal sheets, one with basic markings (two styles of “NASA” and registration markings, manufacturer’s logos) and a second with the gold-bordered blue stripes – a wonderful addition that eliminates the hardest part of finishing the model.
The casting was generally good, but the very rear of the fuselage in my example had a sizable bubble. The first thing I did on the model was to fill the hole with thick CA glue, then sand it back to shape.
Following the instructions, I started building from back to front. That meant adding the tail (the horizontals and the vertical fin) to the fuselage. I cleaned up what little flash there was, then sanded the mating area to minimize the need for filler. David’s instructions quite brilliantly suggest setting a straight edged across the cockpit opening and using this to align the tail – an easy trick that sounds like something an IPMS judge might come up with! Using gap-filling CA, I added the tail and made sure it aligned with the straight edge. A little filling was still needed, which I accomplished by running thin CA into the gaps and sanding it out. The resin casting was very good, which was nice – less quality castings can reveal tiny air bubbles when sanded. There were none on this model.
The engines came next. This are cast on their pylons, with a section of filler that needs to be cut away in the center. When this was done, the two pylons wanted to splay vertically – one or the other wanted to twist upward when added into their slots on the fuselage. I cleaned up the slots and added the engines with slow-acting CA, taking care to keep the engines lined up with the fuselage and with the horizontal stabilizers. In the process, I managed to snap one of the pylons – which made getting the engines aligned easier. I used CA glue to repair the break and sanded it out.
The landing gear struts are a simple, shallow “U”-shaped piece. Photos of the AD-1 from below revealed the gear was noticeably toed in, so I added the strut piece to replicate that trait – even though it put the brake assemblies on the wrong side of the wheel hubs. I sanded the kit’s brake assemblies off and replaced them with styrene strip in the right place.
Next came the lower fuselage insert, which sandwiches both the engine pylons and landing gear struts. Despite my efforts to clean up the joins, the fit here was a little sloppy and I had to pick where I wanted to do a bunch of sanding. I tried to get the areas close to the landing gear and pylon as clean as possible to minimize the work there, for fear of damaging these parts. That left a lot of work along the bottom of the fuselage; three of four sessions of filling with CA and sanding took care of the seams. My secret weapon here was a silver Sharpie pen; running it over the area I had just worked on revealed seams or pits that could be addressed in the next pass. In fairly short order, the fuselage looked nice and neat – just like the real thing!
Finally, I felt like I could turn to the cockpit. Not trusting the model to sit on its nose gear, what with the engines and resin tail being aft of the main struts, I drilled out the area at the very front of the cockpit and added some bits of lead, secured with CA glue. I also added a lead-foil floor to the area under the instrument coaming, to sneak in some additional weight.
The instructions said the cockpit was approximately FS36492, which was light gray in the ModelMaster line. I shook up my bottle of FS36492 and cracked it open only to find that it had solidified into a big paint chip. No problem – using newer enamels from True North, I mixed my own and airbrushed it into the cockpit. It went down beautifully and prepped the area for further detailing.
Detail? With what? You may ask. You can’t have found cockpit photos of this weird aircraft! Well, in the next installment, you’ll see what I’ve found. Thanks, NASA!
When we left off, the model was mostly built and was simply awaiting… a lot of stuff including the paint.
Once the clear parts were in place, I masked them off using Dead Designs’ pre-cut masks. For a long time, I thought these masks were “cheating,” but I’ve come to think of them like a calculator for mathematics. Sure, I know how to do the math on paper, but a calculator makes it easier. I plugged the cockpit opening with moist tissue paper and then sprayed the masked clear parts black so the interior of the frames would appear black.
The cockpit before masking and a first spray of black paint over the masked clear parts.
I had decals for the plane I wanted to build that had the yellow band provided as a decal. I didn’t really trust the decal – if it wasn’t shaped right or long enough I’d be stuck at the end of painting. Instead, since the leading edge ID bands were going to be yellow too, I masked and painted the band and the leading edges. Painting these smaller areas made masking easier than doing them later. I masked them very carefully (Tamiya’s tape for curves was really useful for the fuselage band). I also masked the position lights in the wingtips and the base of the rudder.
With that done, I used the last of my Testors Metallizer buffable aluminum plate over the entire model. I had two reasons for this: one, the bottom of these aircraft were left in metal, and two, it would serve as a base for the significant chipping on the top side. By this time in the war, Japanese planes were being delivered without primer – the national insignia and leading-edge ID bands were exceptions – and the IJN green tended to flake off the aircraft in service.
First up was the natural metal finish on the bottom of the aircraft. I masked several panels with Post-It notes and applied slightly different shades of metal. The fabric-covered ailerons and elevators were painted with a mix of silver and gray, and the center sections received a mix of aluminum plate and titanium. I also painted the cowling and the landing gear covers. Once I had a good appearance on the bottom of the aircraft, I sprayed Testors sealer for Metalizer over the whole model, as a protective coat for the bottom of the aircraft and as a barrier for the next stage in weathering. (Working with these extinct products is bittersweet – just when I figured out how to use them best they became unavailable! If you have any lying around you don’t want any more, let me know!)
The bottom of the aircraft, showing the natural metal finish. Note the variance from side to side, caused entirely by the different angles of light playing off the model.
For the chipping, I decided to try the salt masking technique. I brushed on some water where I wanted my chipping – on the wing roots, fuselage sides, and on the wings. Onto the water I sprinkled popcorn salt, which has smaller crystals; table salt would have been too big in this scale. The salt was allowed to dry in the model before I applied the camouflage color. Once the paint was dry, I’d brush off the paint and have my chipping! That was the plan, at least.
For the top side color, I first tried Testors IJN green, but it looked terrible over the aluminum wing – it was translucent and would have looked cool on a car model, but did not cut it on a Japanese fighter. Instead, I went to a bottle of Aeromaster IJN green – probably the same bottle I used on my N1K1-J 20 years ago! It went on very cleanly and I was very happy – until I realized I had somehow gotten green on the metal finish under both wingtips. Argh!
ModelMaster IJN green over silver – great for your custom car, horrible for your actual IJN fighter.
The green had to go. I lightly moistened a cotton swab with enamel thinner, expecting to wreck the underlying finish as I wiped away the offending paint. To my astonishment, the green came off but the natural metal finish did not! The sealer must have provided a lacquer-based barrier the enamel thinner did not affect. With a new trick in my quiver, I looked for any fuzzy demarcations I could clean up – one side of the cowling and one side of the rudder below the tail were sharpened up with a single swipe of the cotton swab! I un-masked the fuselage band and ID panels and found only a little touch-up was needed.
After removal of the masking on the yellow areas and prior to decals. Look at all that salt! It’s like a Japanese pretzel!
I added the cowling to the fuselage. I used the Metallizer sealer as my gloss coat (an idea borrowed from Ben Pada) and got out my decals. I had markings for Sugita’s plane on a Print Scale sheet, but before I could use them Rising Decals came out with a big sheet of N1K1-J and N1K2-J schemes that included this plane. I ended up using the victory markings and tail markings from the Rising Decals sheet but took my Hinomarus from an old Aeromaster sheet – the Rising Decals insignia seemed to dark in color, and the Print Scale markings were out of registration. Only 10 decals were needed to finish the model off.
The model then received a sludge wash of Payne’s gray, which showed off the nice surface detail and gave the plane an even more weather-beaten appearance.
I carefully applied a coat of flat coat thinned 3-1 with lacquer thinner with my airbrush to the camouflaged part of the scheme, avoiding the natural metal areas. Once that dried, I brushed off the salt, revealing a lovely, uneven pattern of chipping. I added a few more smaller chips with the point of a No. 11 blade. It was more chipping than I’d envisioned, but it was effective.
A wash of Payne’s gray water-based paint popped out the surface detail and made the plane look even more worn.
Each of the exhaust stacks was painted burnt metal, and exhaust staining was applied with pastels. The flat coat helped the pastels stick, and the appearance of the staining over the natural metal chips was quite convincing.
The masking came off the canopy and, unsurprisingly, the results were nearly perfect. The main gear struts were finished and were installed into the wings, along with the kit retraction struts. I also would two tiny springs using wire stripped from a broken computer power cord and installed them as the tensioning springs on each retraction strut.
The kit’s breakable retraction strut – very small, and indicative of the level of detail in the Aoshima kit.
Next, I added the centerline tank using the kit’s mounting braces. The fit on the front brace to the tank was dubious, but some white glue plugged the gap. Next came the inner hear doors, which were cemented in place and were then augmented with photoetched retraction arms taken from an old sheet for the N1K1-J. The main gear doors and strut covers were then added to the struts, taking care to get alignment correct.
I opened up the pilot holes in the leading edges and added the Master Models 20mm gun barrels. These were painted a dark gunmetal color and gently dry-brushed silver across their muzzles. Next, I added the tail wheel and made sure it was securely anchored. The pitot tube was made from telescoping lengths of Albion Alloys tubing and inserted into the wing. Next, I added the landing gear position indicators in the wings using bits of cat’s whiskers painted red using a Sharpie pen.
The finished model, showing off the airplane’s scoreboard.
The last detail was the aerial. I added the radio mast and made sure it was anchored strongly, then painted it green in place. I pulled threads from some smoke-colored panty hose and clipped the ends into some locking tweezers. I lined one end up against the insulator on the tail, touched a tiny bit of CA glue to the mast, and let it sit until the glue set. Stretching the aerial beyond the top of the mast, I repeated the process. When the CA had set, I stretched the excess material and clipped it off close to the mast and the insulator with some flat-toothed cutters. Relieved that it went so well, I was chagrined to realize there was a second aerial running from the tail to the base of the mast! I carefully repeated the process and achieved a successful result.
The final step was to add the canopy and to hang the propeller. Finished!
The Master Models 20mm cannons are a big improvement over the kit’s guns. This shot also shows the exhaust staining on the fuselage.
On the upside, I learned the salt chipping technique, but on the downside, I missed my 45-day challenge by 92 days! Many of the paints I used are now out of production, so this may be a one-time-only experience for me. But I’m pleased to see the model on my shelf – some extra work – and extra research into the back story of the plane and pilot – made this a particularly rewarding build.
Another view of the finished model. The short pitot tube on the left wing is Albion Alloys tubing.
The Japanese Navy’s desire for a floatplane fighter follow-on to the interim Zero-based A6M2-N led to the Kawanishi N1K1 Kyofu, a compact floatplane with laminar-flow wings, which first flew in may, 1942. Only 97 Kyofus were produced before the need for the floatplane fighter evaporated as Japan was forced onto a defensive footing.
Kawanishi was thinking ahead, however: as early as December 1941, the company began work on a land-based version of the plane, resulting in the N1K2-J Shiden. This fighter boasted a 2000hp Homare engine that produced a top speed of 363mph, four 20mm cannon (and two 7.7mm in some models), better armor for the pilot than earlier fighters, and self-sealing tanks. Because it inherited the mid-wing arrangement of the Kyofu, the landing gear was quite tall; this led to frequent gear failures and collapses.
To counter that, Kawanishi engineers re-designed the aircraft as a low-wing aircraft, resulting in the N1K2-J Shiden-Kai. The wings were largely the same, but the fuselage was totally redesigned; top speed climbed to 369mph, and serviceability was far better in spite of the often-balky Homare engine. It also inherited its automatic combat flaps from its predecessors; these extended the flaps automatically during turns to reduce turning radius without subjecting the pilot to excessive G’s, forcing the pilot to use a heavy force on the control column, or causing the fighter to stall. The first N1K2-J was delivered in April 1944, but B-29 raids led to shortages of engines and equipment that limited production to about 425 aircraft.
In combat, the N1K2-J was a handful for American pilots. While it was never a major threat to the B-29s – its rate of climb rarely put it in position to intercept – it was an effective weapon against U.S. Navy aircraft. Because it needed an experienced pilot to get the most from it, the IJN allowed Capt. Minoru Genda to form a Kokutai (group) of experienced flyers. The group, the 343rd Kokutai (replacing an earlier incarnation of the 343rd wiped out in defense of Guam and Palau), had for hikotai (squadrons), did what it could against an overwhelming tide of U.S. Navy aircraft, B-29s and, eventually, P-51s and P-47s, claiming over 170 enemy planes. In return, 82 pilots of the 343rd Kokutai were killed in action, 14 were wounded and 20 more died in flying accidents.
One of the fliers to fall in combat was Chief Petty Officer Shoichi Sugita. Born in Niigata Prefecture in 1924, he earned his wings at age 19 and was pressed into combat immediately. On his first mission, flying from Rabaul, he intercepted and shot down a B-17, but his plane was badly damaged and he crash-landed his burning Zero. On April 18, 1943, he was part of the escort for the G4M1 carrying Admiral Isoroku Yamamoto, and his failure to protect his charges caused him to suffer a mental breakdown that kept him from combat for a number of weeks. The gradual deaths of his squadron members forced him back into the air, but he was seriously burned in August and returned to Japan for treatment, followed by a brief period as an instructor. He requested a return to combat, and he amassed an impressive score over the next year, fighting over Guam, the Marianas and the Philippines. When 34-victory ace Thomas McGuire was killed when he stalled trying to help his wingman, Sugita was the pilot who was his intended target. Officially, Sugita was credited with 63 (including 30 shared) victories by the time he was selected for the 343rd Kokutai in late 1944.
CPO Shoichi Sugita
Sugita scored seven more victories with the N1K2-J, including a mission on April 12, 1945, when he claimed two Hellcats and a Corsair after returning in a badly shot-up Shiden-kai. But Sugita’s luck did not hold. Three days later, the 301st Hikotai received late warning of an American raid on their new base at Kanoya. Genda ordered an immediate scramble, and just as the first N1K2-Js lifted off, 28 Hellcats flying from USS Independence and USS Randolph arrived over the base. As Sugita made his takeoff run, eight Hellcats closed in on him. The CO of VF-46, LCDR Robert “Doc” Weatherup, caught Sugita at about 400 feet and opened fire. Sugita’s aircraft abruptly banked and crashed at the end of the runway, killing him instantly. Genda apologized to his Hikotai leader, Lt. Naoshi Kanno, who was crushed by Sugita’s loss. Sugita was not flying his assigned aircraft at the time; that plane passed to Lt. Masaji Matsumura and, eventually, to Kanno. Following the practice of applying victories to the plane that scored them rather than the pilot, the plane eventually had 16 victory markings.
Back in 1994, Aoshima put out a 1:72 kit of the N1K2-J (and the N1K1-J, and the Ta 152) that had a reputational hill to climb. The company’s earlier 1:72 kits were truly terrible models that bore only a passing resemblance to the subjects they depicted. But the new models were on a par with Academy kits – not overly complicated, but accurate in outline, with recessed panel lines and rivet detail and very clear canopies. I had long-term plans to build an N1K2-J, and I amassed some aftermarket parts for it over time. When I was challenged to build a model start to finish in 45 days, the Shiden-kai was a perfect choice.
The cockpit gained my attention first. I have a copy of Robert Mikesh’s Japanese Aircraft Interiors 1940-1945, which has a nice section on the N1K2-J (four still exist today). Any angles that weren’t visible in that book were covered in the Famous Airplanes of the World issue on the Kyofu/Shiden family. Armed with good references, I started by sanding the rear bulkhead so I could open up the blocked-off framework there. The N1K2-J had four oxygen bottles that mounted in holes in this framework; to replicate them, I sanded .040 styrene rod to a rounded end, then cut it off, drilled the top with a No. 80 drill to accept wiring later, and cemented the four resulting half-cylinders into place on the rear bulkhead. A couple of small details were added to the bulkhead, followed by “hoses” made from fine wire that were CA-glued into the predrilled holes and then worked down the bottom of the bulkhead. When it was time for painting, the tanks and hoses were painted black, with brass “valves” at the top.
The oxygen bottles in place on the aft bulkhead.
Kora does an interior set for this model, but most of the resin in it is crude. I was able to salvage the seat, and I drilled out all the lightening holes in it. I also used the forward bulkhead, which has the prominent gunsight mount, although the gunsight itself looked nothing like the Type 4 Model 1 sight in the real plane. This was made from some styrene rod, metal rod, a photoetched bezel and a strip styrene bit as a “crash pad.”
The sidewalls of the cockpit were sanded flat and I re-built the consoles to better match the real items. Aoshima’s interior parts fit into the completed fuselage from the bottom, so I was able to add some details – map case, switchboxes, fuel pump controls, and the main throttle – to the fuselage sides. The lower mixture control on the left side console was made with halved sections of 1/16-inch styrene rod, topped with wire rods for the control levers. These were then given bulb “handles” with tiny bits of white glue. The trim tab was a cut-down photoetched part, and bits of styrene and lead wire were employed as various switch boxes and pull handles.
The mixture controls and trim tab wheel on the right side were scratch-built. The rudder pedals are installed in this image – upside down! That was caught before painting.
The right side consoles were cleaned up, and the two large instruments were represented with Reheat photoetched bezels. The radio shelf and radio were similarly scratchbuilt with styrene rod and strip.
I took care to get the various visible wiring runs in place, using .2mm lead wire. The rudder pedals were removed, to be replaced by the Kora photoetched examples. The rudder bar mechanism was dressed up with some wire and rod to simulate the complex mechanism in the real plane. I also used Kora’s photoetched instrument panel and its paper instruments; the manifold pressure gauge in the real aircraft is red on its right side, so I colored the appropriate part of the instrument with a .005 red pen, then airbrushed the instrument panel black and drybrushed it with ocean gray. The instruments were cut out and adhered to the photoetched panel with Future, giving them a glossy “lens” look. I also added the center three instruments from another photoetched panel to make up for the three that Kora inexplicably left off. This assembly was then CA-glued to the front bulkhead from the kit.
he instrument panel, in place and painted
The instrument panel in the real plane was installed in such a way that the back of the panel was visible through the windscreen. I carefully glued short slices of .035 and .040 to the back of the panel behind the instrument faces, then drilled holes in them with a No. 80 bit. Each instrument received a wire that was run down the side of the panel, then the back of the panel was painted flat black and dry-brushed with ocean gray.
The wired back of the control panel, fashioned from styrene rod and .2mm wire.
Kora’s seat was painted and weathered with a bit of aluminum dry-brushing. At this point, I lost the seat – after an exhaustive search, I found it inside one of my closed references, with the prominent handle on its left side broken! The handle was replaced with a little styrene rod and metal tubing. The photoetched belts were bent to shape, painted and installed.
I painted the rest of the cockpit, using a dark green as the base color, and assembled the rear bulkhead, floor, seat and instrument as a unit. The control column from the kit was painted to match references and added to the cockpit assembly. I joined the fuselage halves, cleaned up the minimal seams and re-scribed a few panel lines, and then slipped the cockpit assembly into place. The front bulkhead with the gunsight mount took a little test-fitting and sanding to fit cleanly, but once in place it looked great.
The installed cockpit, with the gunsight and its mount prominently on display.
Before the wings went on. I drilled out the exhaust stacks, which are molded to the fuselage sides. There are six stacks per side, so I took care to get things centered before I drilled, starting with a No. 80 and moving to progressively larger bits.
The exhaust stacks after the first pass. Subsequent passes cleaned up the stacks.
I added the lower wing, which needed a .005 styrene shim along the trailing edge seam with the fuselage. The upper wings went on cleanly, with minimal filling at the wing roots and along the leading edge. I re-scribed the wing with a UMM scriber and restored the nice rivet detail with a sharpened tack.
Fit sas generally good, but note the shim at the wing/fuselage joint.
The position lights were carved out of the wingtip using a motor tool and cutoff wheel, followed by small files. I drilled a hole into a bit of clear styrene, then pushed some clear red and green paint into the holes. The backs of the clear styrene were painted aluminum, and then I CA-glued the clear parts into the notches in the wingtips. I sanded the clear styrene back to mirror the original contours of the wingtips and polished the plastic to clarity. I did the same with the prominent formation light at the base of the rudder; this had a clear bulb, so I merely drilled the hole and left it un-colored.
The position light in the tail. Clear bulbs are easy – just drill the hole and leave it uncolored!
The horizontal stabilizers went on with little drama – first, I added them with a little CA glue, then I checked their alignment against the wing. Next came some sanding, followed by some additional filler to fully eliminate the seam, some more sanding and a bit of re-scribing.
I dressed up the kit engine by painting it black and drybrushing aluminum, then adding a collector ring from .5mm lead wire, followed by 18 push rod tubes, each cut from a length of black stretched sprue. I painted a length of .2mm lead wire a tan color and used it to make the ignition wires. The front of the crankcase from the kit was painted gray and given a wash of 50-50 water and Pledge Future Shine with some black acrylic paint in it. All this detail was likely to be invisible behind the propeller spinner, but anyone peeking inside the cowling will get at least a glimpse.
The dressed-up kit engine is smaller in diameter than a penny! Wire and stretched sprue did the job nicely.
Speaking of the propeller, I carefully cut it from the sprue (the attachment points were on the trailing edges of two blades) and cleaned all the flash off with a flexible file. Then, I had to fill sink marks on the back of each blade – a bit of a throwback to Aoshima’s past!
Ouch! Sink marks!
The tips were painted white, followed by yellow, then a thin stripe on the front side of each blade was masked off and the propellers were painted ModelMaster German Schockoladenbraun, a neat match to the primer color Japanese propellers were painted. The cuffs at the propeller’s base were hand-painted aluminum; these are visible when the propeller is mounted in the spinner, so special care was required.
The prop, looking a little nicer.
During the build, I discovered that Master Model did machined barrels for the Type 99 Mk. I 20mm cannons. I ordered them, and then had to consider how to keep to my 45-day schedule while waiting for the barrels to arrive. I didn’t want to paint the yellow leading edges and then potentially mar them by drilling one of the holes for the cannons off-center. Instead, I clipped off the kit’s cannons and drilled pilot holes in the kit fairings. Doing this would allow me to enlarge the holes when the barrels arrived with minimal risk to the paint.
Pre-drilling the guns with small bits enables me to enlarge them later for the brass barrels.
The wheel wells in the kit have adequate detail, but I added some missing structural elements, some wiring and a few details that would enhance the look of the landing gear.
A little detail goes a long way – especially since there’s not much in the wheel wells to begin with!
That seems like a good place for a break! Next time, we get the clear parts in place and begin painting and weathering!
The finished model – decals made all the difference in this build.
It was painting time for my C.202, and I like to add the windscreen and any other fixed clear parts before painting so I can ensure there are no seams to fill after painting. It also protects the gunsight reflector. I dipped the windscreen and the hinged-to-the-side canopy in Future for additional clarity and, once they were dry, added the windscreen to the fuselage with white glue. Once the windscreen was dry, I attempted to mask it with Parafilm M, my usual approach. Then, disaster – my ham-handed attempt to apply the Parafilm knocked the windscreen off, which knocked the gunsight reflector off. Oof! I fixed the gunsight reflector, then re-attached the windscreen with CA glue – then bought a set of pre-cut masks from Eduard! These went on with zero drama.
The wing tip lights were masked with bits of tape and I used wet tissue paper to mask the wheel well detail before painting. Since my old standby paints – Testers ModelMaster – were now unavailable, I decided to try out a new enamel line, True North. They had the colors I needed – FS 30266, flat Africa yellow, which matched the Italian color Nicciola Chiaro 4, and FS 36307, flat light sea gray, which matched Grigio Azzuro Chiaro 1. I also bought flat white, satin black and some colors for other projects while I was at it.
Before I applied the camouflage colors, I pre-shaded the panel lines with Floquil engine black. I’m not a big fan of this practice, but I thought I could make it work with the relatively light color of the base camouflage. Next, I loaded up some of the True North flat white in my airbrush and painted the white band around the fuselage; I found it thinned just like ModelMaster and covered very well. I also painted the spinner, and the tips of the propeller as a base for the yellow – and then, while I was at it, painted eight more propellers from three other kits. I don’t like to waste paint, and this is a nice way to make use of it while giving yourself a gift in the future. All the propellers then had their tips airbrushed yellow, and once dry a scale four inches of the tips were masked and I painted the blades with True North satin black. This went on nicely, but it takes about 10 hours to dry thoroughly – take care in touching them until they’re all dry! The next day, I took of the masking and had 29 perfectly masked prop tips, including three on the Macchi’s propeller.
True North’s flat Africa yellow looks very thick in the bottle, so I thinned it a bit more than usual. That was a mistake – my first batch was too thin. Adding thinner at a 3:1 ratio allowed it to spray very nicely, but it was still a bit translucent. That wasn’t really a problem – I sprayed it over the pre-shading and could build up the color until the pre-shading was nearly invisible, which was just the effect I wanted. I made sure I painted the leading edge of the lower wing and horizontal stabilizers – as if this scheme wasn’t difficult enough, the camouflage wrapped around the leading edge of the wing. It also wrapped around the nose and the tail aft of the wing.
True North’s flat Africa mustard goes on a little translucent but looks the part.
I masked the nose, the lower wing leading edge and the rear fuselage with Tamiya yellow tape. The leading edges of the horizontal stabilizers were masked with Tamiya tape or curves. The True North light sea gray behaved similarly to the flat Africa yellow, although it was much more opaque. After a few minutes, the masking came off – there were no issues that required touch-ups.
Note the wrap-around on the ;eating edges of the wing and tail.
Now for the rest of the camouflage. Each of the three factories that made the C.202 had its own camouflage pattern – Breda with a “snake squiggle,” SAI with its “little hearts,” and Aer Machhi with its “smoke rings.” Since my plane was made by Aer Macchi, I was faced with the dreaded smoke rings – but some years ago, I’d purchased decals from Mike Grant that provided these Verde Olive Scuro (dark olive green) blotches with soft edges, a solution that would certainly be easier than trying to airbrush them in 1:72
While some cranks referred to these decals as “the end of the hobby” when they were released, decaling your entire model is not easy. First, you need to get a very good gloss coat or your model will be a silvered mess. I applied two coats of Future to the model with a broad brush. Next, I checked with my photos – although the factory applied the smoke rings at random, I was building a specific plane, so I wanted my camouflage to reflect the real plane as closely as possible. I replicated the pattern that was visible in the photos, then used the existing pattern to fill in the blanks. Over the course of two days, the model was covered in smoke ring camouflage – a grand total of 106 smoke rings. The ALPS-printed decals snuggled down well, but the ink is a bit fragile – handing it can wear it away and force you to make repairs.
Oh no! I killed the hobby!
Next came the markings for “Dai Banana!” These came from a Sky Decals sheet. I started with the Stormo logo and first-layer deals – a white version of “Dai Banana” for the nose and the Savoy Cross on the tail. The crosses on the sheet were notably oversized, so I carefully cut them down before applying them. Later, I applied the yellow “Dai Banana!” to the nose and added the crest of the House of Savoy to the cross, then added the data plates, fascist badges and wing insignia, and finally the squadron and aircraft numbers. I also added the Aer Macchi decals to the propeller.
All the decals in place – including the cut-down cross of Savoy on the tail.
The main danger here was silvering. I spent considerable effort hunting down any areas that displayed any silvering and pierced the decals before applying more SuperSol. When that didn’t work, I went with diluted Solvaset, followed by full-strength Solvaset. That worked, eventually. A second coat of Future was brushed on in advance of a watercolor “sludge wash” made with dishwashing liquid and Payne’s gray paint.
The wash was especially effective on the underside of the plane.
Once the wash looked right, I applied a coat of Testors Dullcote, thinned 1:1 with lacquer thinner, to kill off the shine. This seemed like a good time to paint the exhaust stacks; I brushed on some stainless steel paint, then drybrushed a shade of rust, followed by darker metal, followed by a final layer of dark brown. The exhausts are the weakest part of the kit; if I were to build it again, I would take steps to integrate a set of the aftermarket resin DB601 exhausts available today.
It was time to get the model on its landing gear. I had painted the wheels earlier in the build process, and now I detailed the Mister Kit resin struts, first by removing the anti-torque scissors so they could be replaced by photoetched parts from Eduard. The struts were painted gray, with chrome silver compression struts, and the Mister Kit photoetched gear door covers were airbrushed appropriate colors. The braces connecting the struts to the gear was folded together and added to the gear doors very carefully. I added brake lines to the back of the strut wheel housing, with corresponding lines on the inside of the gear doors to match my references. The struts were plugged into the wheel wells. The fine retraction struts were carefully removed from the kit trees with a razor knife; I cleaned them up, painted them and added them to the gear.
The center gear doors were attached to linkages that featured a small pedal-like feature; as the struts came up, the wheel would catch the pedals and pull up the center doors. The linkages were available as photoetched parts, but they required careful folding and positioning to make them symmetric from side to side. Once they were in place, I added the center doors with white scenic glue.
The main gear doors were next. I added one, then the other, with white glue. The upper strut doors were next; I took great care to make sure they were aligned with each other and to the wing. The next morning, while admiring my handiwork, I saw that one gear door was noticeably lower on the strut than the other one. I carefully removed the offending gear door, and in the process knocked off the upper strut doors, then knocked off the entire other landing gear! Much consternation ensued, followed by focused work restoring the model to its previous degree of completion.
A simple Future-based wash greatly improved the look of the photoetched gear doors.
Far simpler was the tail wheel. I had painted it early in the build process; it was simply CA-glued into place, with care taken to make sure it was aligned properly.
One of the details missing from the kit – but very visible in any profile image – was the belly-mounted Venturi used to power the electrical system. I made my own Venturi from a short length of Albion Alloys brass tubing by flaring one end using an old airbrush needle. Inserting the needle in one end of the tube, then forcing the needle into the tube by tapping it assertively against my workbench, bent the metal just enough. The Venturi was added to a styrene strip strut and it was glued to the plane’s belly just ahead of the radiator.
The Venturi, in place ahead of the radiator.
The kit canopy had been masked and painted from the outside, but I realized that, when open, the interior would be very visible and the glossy interior frames needed to be addressed. I masked the interiors frames – vertical first, then horizontal – and sprayed them flat black in two separate sessions. The canopy was carefully mounted on the starboard sill, and a small length of .3mm nickel-silver wire, painted white, was added to simulate the retaining cord, which kept the canopy hinges from being overstressed. I also added small lengths of fine wire to each inner side of the canopy to simulate the opening handles. I touched them with scenic glue to create round ends, then painted the rods black and the bulb ends red to match my photos.
The exhaust stain in place – subtlety is the key. Note the hard sight.
I added exhaust stains to the sides of the fuselage with pastels – a mix of dark grays and black, brushed on with a short, cut-down brush, scrubbing it into the flat coat. I used my references to ensure the pattern of the staining was consistent with reality. The Valiant Wings book showed the plane had a set of external hard sights – a bead about mid-way on the nose and a ring on a post just outside the windscreen. Scrounging through my photoetched parts, I found the ring on a post on a Reheat set intended for U.S. aircraft. I drilled holes using a No. 80 bit, then added the ring and post, taking care to keep it aligned to the windscreen. The bead was made from some .4mm metal rod, which was CA-glued into the model and then cut to length with wire cutters.
Instead of using the kit’s plastic pitot boom, I used two lengths of telescoping brass tubing from Albion Alloys of the proper size. After CA-gluing the boom into the hole in the wing, I painted the boom African mustard.
Earlier, I had drilled a hole to accommodate the kit’s antenna mast. Now, I glued the mast in place, painted it African mustard, and started rigging the aerial, using fibers from a pair of smoke-colored panty hose. The wire “insulators” I installed early in the build served as anchoring points. Using mini-clamps and locking tweezers, I stretched the fibers around the tail post and applied a tiny bit of CA. Positioning the clamps and tweezers allowed the glue to dry without the fibers moving. When dry, the fibers were stretched to the antenna mast and secured there. The excess on each end was stretched, then cut close to the anchoring point with Unifit 90-degree cutters. The aerial leading to the fuselage was attached to the main aerial and then stretched carefully to the fuselage insulator, again using the 90-degree cutters to cut off the excess. The glue set up on the fuselage in a slightly messy way, but photos showed a fairly large insulator on the real plane. I applied a bit of scenic glue to the mounting point and hid and sloppiness; the new “insulator” was painted black.
The wash was especially helpful in popping out detail on the air filter.
The only thing left was to add the propeller – and just like that, after almost two decades, the C.202 joined my collection of finished models! It was worth the wait – the Valiant Wings book on the Folgore was invaluable in this project. The decal camouflage and the multitude of small details made this a learning experience 20 years in the making.
The aerial in place, including the black “insulator” on the spine that obfuscates some sloppiness in the attachment.
When green fighter units deployed to the Mediterranean Theatre, the veterans told them there was only one plane they couldn’t out-turn: the Macchi C.202. A development of the C.200, the C.202 swapped a license-build DB601 for the A.82 radial that held the C.200 back. It also boasted a new wing, an enclosed cockpit, and tremendous maneuverability. Holding it back was its armament: two 12.7mm machine guns firing through the propeller arc, plus two 7.7mm guns in the wings on later aircraft. These additional guns were often removed because of the weight and maneuverability penalties they imposed. The machine also suffered from balky radios and a criminally unreliable oxygen system that led to a remarkable level of aborts.
A Macchi-built C.202 Serie X of 51 Stormo.
The C.202 was produced in an assortment of Serie, which translates roughly into production blocks: Serie I was basically a developmental run of just 23 aircraft which reached squadron service in June, 1941. From there, 14 more Serie were built, although the total of C.202s built was only 1,191, coming from Aermacchi, Breda and SAI Ambrosini. For modelers, this creates a real conundrum – you have to identify the plane you wish to build, then check features like the tailwheel fairing, armored windscreen, various bulges and vents and even the shape of the elevators.
One of the top scorers in the C.202 was Ennio Tarantola. As a youngster, he sold fruit from a pushcart in the Piazza Cavour, earning him the nickname “Banana.” He dreamed of flying and earned his license to fly at 17 after training in gliders before joining the Regia Aeronautica.
With a whopping 110 hours under his belt, Tarantola was sent to Spain to fly the CR.42 with the Condor Legion, where he achieved his first victory over a Republican I-15. After Italy joined the war, the promising pilot was selected to train on the Ju 87. On June 29, 1941, he scored a hit on destroyer HMAS Waterhen, which had to be taken under tow. The next day, his unit finished off Waterhen, but Tarantola was himself shot down and ended up in his dinghy for 18 hours. After his rescue, Tarantola decided that eight months in the Stuka was enough and he requested a transfer back to fighters.
Ennio Tarantola describes his most recent air combat next to his Macchi C.202 Serie VII. Note the victory markings under the rear arm of the Savoy cross on the rudder.
On Nov, 4, 1941, he was assigned to the Fiat G.50-equipped 151 Squadriglia, 20 Gruppo, based in Tripoli, and a month and a day later scored his second victory, an RAF P-40 Warhawk. Later that month 20th Gruppo withdrew to Italy to re-equip with the new Macchi C.202, and they were back in combat flying from Sicily during the massive effort to knock out the island fortress of Malta. On July 1 and 4, Tarantola shot down Spitfires, and became an ace by sharing Spitfire kills with Sqaudriglia commander Capitano Furio Nicolot Doglio, The pair downed another Spitfire on July 25, but two days later Doglio was killed in combat by Canadian ace George “Buzz” Beurling, Tarantola was wounded in the same battle.
On Oct. 11, Tarantola claimed yet another Spitfire, but three days later he survived another close call when he was forced to bail out near Sicily, again being fished from the sea by a search-and-rescue flying boat. 20 Gruppo was withdrawn for rest in December and did not return to combat until May, when it moved to Sardinia. Flying from the island, Tarantola scored victories on June 28 against a P-40 and a P-38 on July 30. On August 2, the war came to Sardinia and Tarantola flew five missions against raiding American fighters that day, claiming two 14th FG P-38s and damaging an OA-10 Catalina.
After Italy surrendered, Tarantola joined the ARN and flew against allied bombers. On April 24, 1944, he was flying a Fiat G.55 against a B-24 formation over Turin when he was jumped by P-47s, which shot his plane up and forced an injured Tarantola to bail out. He burned on the legs so badly he did not fly for the rest of the war. Tarantola joined the new Italian Air Force as an instructor and then as a demonstration pilot, retiring in November 1960. Marshal Ennio Tarantola passed away in 2001 at the age of 86.
Tarantola’s C.202s wore the exhortation “Dai Banana!” (Go Banana!) or the right side of the cowling, which was why I chose to build his aircraft from the summer of 1942. Macchi C.202 MM9066 was a Serie VII machine; internet sources say the Hasegawa kit is a Serie III aircraft. What are the differences? There aren’t many. The most notable are the wing-mounted 7.7mm Breda-SAFAT machine guns in the wings, the armored windscreen (which was included in the kit), increased armor protection in the cockpit, and an additional bulge on the cowling. The tail wheel was also slightly modified, but this would be hard to see within the tail wheel fairing.
When I started this model, none of this was known to me – that was about 20 years ago. I think I leaped into it a blissfully unaware builder. The Hasegawa kit was not without faults – the wheel wells were basically empty holes.
The Hasegawa kit also inspired much debate over the shape of the fuselage, especially the hump behind the cockpit. Mister Kit in Italy made a replacement, which also included photoetched and resin details for the cockpit and wheel wells and resin control surfaces for the tail planes. True Details also did an interior, and Eduard itself did a photoetched set. I suppose that when I started I had come across all of these items – maybe in contest raffles or at club auctions. I’m honestly not sure! But I launched into the build, painting up the True Details cockpit using the recommended green and silver colors, and finishing up the resin control panel with its integrated gunsight. This was all added to the Mister Kit fuselage halves, which then received the cowling and tropical filter from the Hasegawa kit. The wings came next; the lower wing was added, the True Details resin wheel well “spaghetti” was dropped into the center of the wheel well, and the top wing halves were cemented into place.. There were significant gaps here, which were addressed with CA glue and sanding.
And then, something happened. Maybe it was those blank wheel wells. Maybe I started obsessing about the “smoke ring” camouflage. Whatever the reason, work suddenly stopped and the Macchi took its place on the Shelf of Doom, where it sat, enduring two house moves and 19 years. Eventually a “Shelf of Doom” challenge proposed by my friend Roy Sutherland cajoled me into re-starting it.
What’s in the box? WHAT’S IN THE BOX?!? Note the tape residue on the models’ wings.
Looking in the box after almost two decades was confusing. Where did all these non-kit parts come from? Why did I stop work on the wheel wells? Where are the tail parts? I took stock of what I had – an extra fuselage? Painted resin cockpit parts left outside the airplane? – and started to think about what I lacked. I did remember that years ago I’d purchased a Sky Models decal sheet with the plane I wanted to build on it; some years later, I bought a sheet of smoke ring decals from Mike Grant (which, apparently, destroyed the hobby, according to some people). What did I lack? A good reference – the “In Action” book wasn’t helpful on for the wheel wells and other details. I started scouting around on the internet and spotted something familiar: Valiant Wings’ book The Macchi MC.202 Folgore: A Technical Guide. I had reviewed this for the Journal in 2015 and had it sitting on my bookshelf! Now I was set!
First up: the model had residue from asking tape chord-wise across the wings. I think that was there to protect the detail from sanding way back when. This came off easily with an application of Goo Gone sticker lifter. (Note: never mix up Goo Gone with Goof Off. One is friendly to plastic and the other is very much not. Do not ask how I know.) Next, I revisited the wing root seams, which still had CA glue build-up on them. After almost 20 years, I was afraid the glue would be rock hard, but sanding sticks made short work of them with little disruption of the plastic surface. I re-scribed the wings and noticed that each wing had two rectangular plates at the join of the wing to the wing root at the junction of the major panels. Instead of attempting to scribe these reinforcing plates, I made some from .005 styrene and put them in place with liquid cement.
The re-scribed wings, with the reinforcements aded at the wing roots.
I cleaned up a few other joins around the wing leading edges and the cowlings. That left the wheel wells – which were already enclosed in the wing. Detailing them was a little like a game of “Operation,” where tweezers played a critical role. I added the roofs the wells with styrene sheet, then used strip for the ribs. The tangle of wiring at the center – part of the accessory section for the engine – was painted a rust color, given a wash, and then detail painted; other hoses and wires were added where needed to extend that detail through the bay. When I’d first assembled the model, I used Mister Kit’s nice brass rear bulkhead, but lacking photos, I added it a few millimeters away from the well opening. The Valiant Wings book showed this bulkhead to be flush with the opening, so I used the Eduard part and aligned it properly, The Mister Kit part is now entombed inside the wheel well, never to be seen again.
The wheel wells after detailing (but before a flat coat was added).
Next, I added the engine bearers and the parts attached to them with Albion telescoping brass tubing. This was a “two steps forward/one step back” operation, with items getting knocked loose and being repaired constantly, not unlike the real item! When the bearers were in place, I’d gone as far as I could – the next details would require the mounting of the gear doors and would come during final assembly.
The next major assembly I thought to add was the radiator and oil cooler. Both of these betrayed the kit’s age – although the parts had fences inside them to prevent a “see-through” effect, there was no attempt to replicate the radiator or oil cooler screens. Research showed the to be complex areas, especially the radiator. Front and back, the radiators had “X”-shaped reinforcing rods, and a set of braces stabilized the radiator “doghouse” structure.
The radiator and oil cooler with added mesh and metal rod detail.
I used sections of wire mesh coffee filter material to replicate the screens in the radiator and oil cooler, then the radiator received sections of .01mm metal rod to replicate the radiator reinforcements. A small founded fairing immediately ahead of the radiator intake was fashioned by shaping the end of a piece of .040 half-round styrene, then snipping it off and CA-gluing it to the model. The radiator and oil cooler interiors were painted and added to the model, and then the bracing for the radiator doghouse was added using small lengths of .005 styrene sheet. The exterior of the doghouse also had some visible external latch details absent from the kit; I made these from .005 styrene and added them with liquid cement.
A view o the radiator from the front, showing the bracing made from .005 styrene and the half-dome fairing fashioned from .40 half-round stock.
The kit had no position lights on the wingtips, so I cut a notch into each side and found some clear styrene sprue, which I sanded flat on one side. Using a No. 80 drill bit, I made tiny holes in the clear styrene, then painted the styrene aluminum and then forced some Tamiya clear red and clear green into the holes. The painted clear styrene was CA-glued into the notched, with care taken to center the colored “bulbs” (remember – left is red, right is green!). The bulbs also needed to be oriented to where they were mounted in the wingtip in the real plane. Then it was merely a matter of sanding away everything that wasn’t a position light. When the contours were about right, I started polishing them with fine grades of sanding sticks and finally with Blue Magic auto polish. Once they were clear, I rescribed the area.
The left wing tip, with the finished position light in place.
The gunsight was missing its reflector, so I made one from a bit of window envelope cellophane. After carefully cutting it to shape, I ran the edges across a Sharpie pen. This gives it a black frame and also makes it much easier to see and work with! The reflector glass in the C.202 was raised on a pair of rods; I made this from a modified bit of 1:700 ship photoetched metal, and the gunsight was glued in position. To protect the reflector, I added the windscreen from the kit; this had been dipped in Future floor polish, making it possible to use CA glue to put it in place without fogging.
The gunsight reflector glass in place before the addition of the windscreen.
For once, I remembered to add the aerial mounting points before the model was painted and decalled. The tail was tough – it’s very narrow, so it was hard to drill a hole to accept a metal rod. After a couple of attempts and some remedial surgery, I managed to drill a centered hole. A tiny bit of .1mm rod was inserted and cut off close to the tail. A similar hole was drilled – with much less hassle – on the rear fuselage at the aft of the “hump” and a metal insulator was CA-glued into place and cut off. These make rigging the aerial much easier.
The two insulators for the aerial, already in place. The aerial wire will run from the tail to a mast antenna, with a lead running to the fuselage.
The resin tail components were added next. I needed to open up the mounting holes for the resin horizontal stabilizers, because they were slightly flashed over on the Mister Kit fuselage. I CA-glued the stabilizers into the fuselage, checking for alignment with the wings. Once dry, I carefully added the elevators; the base of one unit needed a .005 shim to fit properly. Again, care was taken to get the elevators dropped at the same angle to preserve alignment.
The rudder came next. It too needed a shim at the bottom to give it the correct height. The resin rudder was also thinner than the plastic vertical stabilizer, so I carefully sanded the plastic tail to thin down its trailing edge. The rudder was sanded a bit to get a good fit, then added slightly deflected to port.
Since the Mister Kit fuselage was missing the fuel filler port on the fuselage hump, I added my own. I drilled a depression into the hump, using my references to position it correctly. The filler cap is a slice of .020 styrene rod, glued in place appropriately.
Fuel filler, with tiny little cap. The answer to the question, “why didn’t the C.202’s canopy slide back?”
At this point, the model was ready for paint. We’ll see how that goes in part two of our story!
We we last left off, the scratch-built landing gear had been added to the Special Hobby 1:72 Firefly Mk. I. Naturally, next came the gear doors. The kit doors are thick and featureless. Again borrowing from my previous Firefly build, I used the Airwaves doors intended for the Airfix kit. These have detail on the inner faces, but I added my own structural detail with .035 styrene strip and .30 rod.
A close-up of the gear and gear doors, with added structure. The tire/wheel is from Barracuda Studios.
After the gear doors were painted, given a wash and dry-brushed, the gear doors were carefully added to the model to complete the landing gear. I assembled the A-frame tailhook, provided in the kit as a styrene frame with a resin hook point. To get the frame to fit into the grooves in the bottom of the fuselage, I had to sand the frame flat on the top side. After sanding, the hook point was added, the hook frame was painted and the assembly was added to the fuselage.
The tailhook assembly in place on the lower fuselage. Sand the A-frame flat on the top side and it’ll fit much better.
With the model on its gear, I turned my attention to the rockets. As provided in the Airfix Beaufighter, they have reasonably thin fins and the correct shape for 60-pound HE warheads. I started by cleaning off the faint mold lines from the rockets, then drilled out their rear ends with a small bit and a pin vise. I painted the rockets an olive drab color. The bodies of the rockets were masked and I painted the fins and warheads a slightly different shade of green. Once dry, each rocket’s fins were chucked into my motor tool. After a check of the alignment, I spun the rockets and then touched a small brush with red paint to the front of the warheads, then did the same at the rear of the warhead with brass paint. All eight went without incident, although I had to touch up a few sets of fins.
Next, I used a tiny brush and Testors aluminum to paint the saddle brackets. When they were dry, I carefully added the rockets to the blast plates, working from the inside out to minimize the possibility of knocking off the gear doors.
A little later in the build process, I decided to add the pigtails to the rockets. These were the electrical connections that led from the rocket to the aircraft. When the pilot fired a rocket, the electrical signal traveled through the pigtail, which was then severed by the rocket blast. The pigtails were connected to sockets in the blast plate immediately before take-off. To create them, I cut used a black Sharpie to color a length of.02mm lead wire, then trimmed eight 3/4-inch lengths and CA-glued them into the backs of the rockets. To replicate the plug at the back of the pigtails, I applied a small bit of scenic glue, which was painted black once dry. The flexible pigtails were posed so they all drooped at the same angle once completed.
The simple addition of pigtails to the rockets greatly enhances the model’s realism.
The sliding canopy and the opening sections of the observer’s canopy were sourced from a Falcon set for FAA aircraft. I dipped them in Future, and when dry I masked and painted them The canopy was painted black, then given a coat of extra dark sea gray, so the interior appeared black. I added two small pegs to the front lower corners of the canopy to aid with attachment to the model; a little white glue on the pegs stuck the canopy in place perfectly. The panels of the observer’s cockpit folded, so I had to think through which surfaces would be exposed to the viewer and not folded over. The large folding panel on the side of the canopy was masked on its inside and painted black so there would be no shine; the other two panels were masked on their outsides and painted black, followed by the camouflage colors. The top panel was displayed folded down into the observer’s cockpit. A tiny spare photo etched bracket was carefully glued to the central frame of the large folding panel and painted black, then the last folding panel was attached to the large folding panel and the assembly was added to the model to match a photo I have in a reference book showing this somewhat complete arrangement.
A view of the cockpits. All the articulated parts of the canopies were vacuformed replacments.
The rear-view mirror provided on the kit’s photoetched sheet had the mirror surface painted with a Molotow chrome marker. When that was dry, I carefully outlined the framing with extra dark sea gray, and painted the rest of the frame, folding it to shape so it mounted properly atop the windscreen The finished mirror was fixed in place with a little CA glue.
Careful painting of the rear-view mirror makes it detail that catches the eye. It’s a photoetched part supplied in the kit.
The kit’s other intimidating details were the screens over the carburetor intakes. These tiny oval screens were painted on the tree. While the paint was free, I blew through them to keep the paint from clumping in the mesh. The dried screens were cut from the trees so that some of the attachment points remained – the real screens were held an inch or two away from the intakes by small posts. Using sharp tweezers and white glue, I put the screens in place, holding my breath the entire time.
I used a mix of pastels for the exhaust stains on the side of the nose. A combination of browns, grays and blacks gave me the variation I needed; I applied small amounts of the pastels to the nose, then blended them back with a soft brush, then used a bristly cut-off brush to remove excess pastel.
The exhaust staining, added in pastel chalk, is clear in this shot. Study photos to see the pattern on the plane you’re building – they’re often very different from plane to plane.
The radio altimeters and the pitot head were added with tiny amounts of scenic glue. I like this material for these items because it holds fast, yet when you inevitably knock the antennas off it doesn’t mar the finish and you can clean up the excess adhesive easily before your next try. It also gives you adjustment time to ensure these details are aligned to the airflow. The kit pitot head got lost at one point – I made a new one from Evergreen rod and strip.
I carefully drilled a tiny hole in the leading edge of the tail and inserted a bit of metal rod, which was cut off close to the plastic surface. A similar process installed the insulator in the fuselage where the aerial lead went into the observer’s cockpit. Then, I added the radio antenna mast from the kit, cleaning it up and painting it extra dark sea gray after it had been put in place. The mast should be at about a 7-degree angle to starboard; that allowed the aerial wire to be clear of the observer’s cockpit canopy opening.
Using fine nylon fibers picked from a pair of black panty hose (buy your own pair – do not borrow your significant other’s), I wound the aerial around the insulator in the tail ands stretched it across the top of the aerial mast, securing it with CA glue. At both ends, I stretched the excess behind the glue spot and cut it off with a set of small surgical scissors. Then, I did something similar with the fuselage insulator running it up to the long aerial and fixing it with CA glue. With the small scissors, I then managed to cut off the excess and also slice through the long aerial. I removed the ruined aerial, but I saved the short length, so I merely re-strung the long aerial and carefully re-attached the short aerial. Not carefully enough – at this point I detached the antenna mast from the fuselage so it was dangling by the antenna wire, threatening to get CA glue all over the model. I ended up carefully drilling out the base of the mast and putting another hole in the fuselage, and inserting a metal pin to hold the mast in the right place. Eventually, the aerials were all secure and I learned my lesson.
The radio aerial in place, with white-glue insulators.
With the aerials in place, all I had to do was add the propeller and spinner. Done! It was a bit of a battle, but the results are just what I was after – a rocket-armed Firefly wearing the least-known of its three wartime schemes, weathered and ready for action. With a bit of resourcefulness and plenty of determination, the Special Hobby kit builds up into something to be proud of.
Just a little weathering can go a very long way…A view of the gear and rockets1770 Squadron Fairey Firefly Mk. I
After I pulled the masking off the Firefly and looked at the slate gray, something looked a little… lurid about the color. Roy Sutherland chimed in with the same opinion: it was too saturated a color and needed to be toned down. The Floquil color went on well, but looked a bit weird. In fairness, in combination with the extra dark sea gray it would have been a good camouflage color, because the two next to each other were hard to look at. Just the same, I re-masked the model and mixed up some ModelMaster slate gray, which was spiked with flat gull gray to tone it down further. The paint went on, the masks came off, and the model looked more like a proper FAA Firefly.
The modified paint job looks more the part of an FAA aircraft in 1945 and much less psychedelic. Another view of the paint, pre-decals.After the repaint. The exhausts were masked during painting.
Before I painted the bottom if the plane, I decided to figure out the rocket arrangement. The Firefly Mk. I carried four rockets on each wing, mounted on a large rectangular blast plate. This held the rocket rails; it also had electrical attachments in the back for the “pigtails” coming off the rear of the rockets. Most challenging, it also had openings for the shell casings, since the shell ejection chutes were beneath the blast plates.
I had already decided to swipe the rockets and rails from an Airfix Beaufighter destined to become a “Torbeau,”and it occurred to me to check the Beaufighter blast plates while I was at it. The plates had a vertical rear end, but careful cutting and sanding created the right shape for the Firefly. The challenge was to open the shell chutes; I drilled pilot holes, then cut out a large square opening. This was sectioned into four smaller openings using .020 styrene strip, which was applied using CA glue. The whole mess was sanded flat. Finally, I drilled out the electrical openings and stuck the blast plate to the wing, lining it up with the cannons and the outer opening of the landing gear bays. Ince in place, I applied the sky camouflage to the bottom of the plane.
The modified blast plate, stolen from an Airfix Beaufighter. I cleaned up the link and shell ejection chutes more – then realized they’d be hidden by rockets and rails.
Photos of the very aircraft I was building showed that its lower roundels had been painted over in sky, which appeared lighter than the original color, leaving a slightly paler square where the roundel had been. I took the kit decals, still in their bag, and used the roundels to determine the size of the square by placing strips of tape on the plastic, with the roundel decals as a guide. The masking squares were peeled off the bag and placed on the model, and a lighter shade of sky was shot on the wing.
The underside of the plane, with the painted-out roundels apparent on the wings, as are the rocket blast plates.
A gloss coat of Future was applied to the model and it was time for the decals. The DP Casper lower wing roundels went in the middle of the pale sky squares with no problem, but the roundels on the upper wing were out of register, with a which corona peeking around the blue edges on one side. No problem – I had an Aeromaster sheet with the same markings handy and applied those roundels, plus the fin flashes from the Aeromaster sheet. The codes and small side roundels went next, plus the “Royal Navy” legend and serial numbers. These went on with no problem, but the flashes wouldn’t snuggle down. The wing roundels really didn’t want to behave – they wrinkled, so I applied SuperSol, then SolvaSet. They un-wrinkled but soon a weird texture appeared on them – they were reacting with the Future, creating a rash-like appearance contained just on the roundel.
Stripping them off, I found patches of texture etched into the gloss coating. When everything was dry, I sanded the affected areas with a 3000-grit sanding cloth, re-applied the Future, and sourced a second set of Aeromaster decals. This time, when I put the roundels in the water, they shattered. Instead of hunting down yet another Aeromaster sheet, I dug out a Techmod set for the Hellcat with contemporary markings – the style of national insignia carried at this time was short lived and thus there were few options in my decal collection to draw from! These roundels were slightly larger but still matched the photos, so I added them to the model and crossed my fingers. They worked beautifully. I also added walkway decals from the DP Casper sheet.
Examining a new photo I had found of DT934, the plane I was building, I noticed that the “4” was peeking out from behind the wing. That meant the codes read 4-K on the starborad side. Glancing at the model, I realized I had applied the decals to mirror the port side – they read “K-4!” I couldn’t believe I’d actually 4-K’ed up my model! The offending decals were lifted with tape and extras from my spare Aeromaster sheet went on in their place.
With the decals on, I applied another coat of Future, and once dry, gave the model a healthy sludge wash of Payne’s gray, which brought out the panel lines. Some missing fastener detail was added with a .05 Micron pen, and once all the panels looked consistent the model was shot with Testors Dullcoat, heavily thinned with lacquer thinner. The objective was to take the shine off the model but not render it totally flat.
I added some wear to the walkway panels with a silver Prismacolor pencil and some gray pastels. I also took the opportunity to scrub some gray pastels into the wings and fuselage, providing the rest of the weathering I’d need (except for the exhaust stain, which would come at the end of the build).
Another view of the model. showing how a small amount of weathering can change the character of the finish.
The tail wheel was painted and installed, and the tail gear doors were cleaned up and painted. Contrary to the kit’s instructions, the Firefly’s tail wheel doors close on the ground, but the half-circle openings on each door that wrapped around the tail strut were in the wrong place so the doors would not close. I made new doors from .035 sheet styrene.
The main gear came next. I knew from my previous build that the main struts in the kit were terrible, indistinct stalks that didn’t look like the real things. I used the formula from my previous build: 1.2mm brass tubing from Albion Alloys provided the main structure of the strut and doubled as the shock strut. The main portions of the leg were represented with lengths of 1.5mm brass tubing; the shock strut went inside these and was secured by a bit of CA glue. Reinforced areas on the strut were made from small rings of 1.8mm brass tubing.
God bless you, Albion Alloys! Three sizes of telescoping tubing were used to make new struts. The finished struts, with the beautiful Barracuda Studios wheels in place. Be careful to drill the holes in the wheels so that when you add them to the axles they are the same distance from the strut on both gear.
Once the strut was all together, I used a round microfile to impart a curved recess at the base of each strut. Two small sections of 1.5mm tubing were cut and a small hole was drilled in the top of each one. A half-inch length of rod went into the hole, and the rod was given a coat of CA glue and fed into the strut until the top of the axle fit flush into the rounded end of the strut. The back of the axle was plugged with styrene rod; on the other side of the axle, more telescoping tubing provided an attachment for some resin Barracuda Studios wheels, which were drilled to fit. Fine lead solder was used to create the brake lines.
The 1.5mm tubing fits neatly into the attachment points in the kit’s wheel bays, giving the scratch-built struts a strong anchor. The resin retraction rods and the photoetched anti-torque scissors provided in the kit were used to finish up the gear, and the wheels and tires, which had already been painted and flat-coated, were brushed with pastels. This makes them appropriately dirty, and it also makes them dead flat.
On its feet, showing off the scratch-built struts. The gear was painted aluminum and given a heavy wash; I also added styrene half-circles on the connections of the retraction struts .
Next were the gear doors. The kit doors are thick and featureless. Again borrowing from my previous Firefly build, I used the Airwaves doors intended for the Airfix kit. These have detail on the inner faces, but I added my own structural detail with .035 styrene strip and .30 rod.
Next stop: the rockets, the radio antennas and final assembly!