Yesterday, I was able to go aboard USS Hornet before museum hours and set up the Battle of Midway display. Here’s a “guided tour” of what’s in the case:
Here’s an overview of the display. All the cards have the name of the plane, the names of the crew and their unit, a description of what that crew did during the battle, and the technical specifications of the plane in question. (An aside – I was astonished at how much lighter the B5N2 and D3A1 were in comparison to the Devastator and Dauntless – they’re larger planes, but each is about 1000 pounds lighter than its counterpart!)
Azusa Ono built this terrific D3A1. You notice we didn’t call it a “Val” – since those names had yet to be introduced in 1942, we thought it best to use the comtemporary nomenclature.
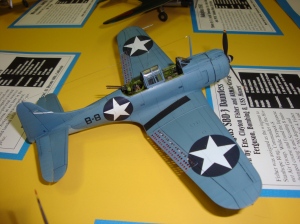
Here’s my SBD-3, built as Clayton Fisher’s plane on June 4. He was Stanhope Ring’s wingman as Ring led Bombing 8 and Scouting 8 in the wrong direction, a decision that’s still controversial today.
Brian Sakai worked miracles to complete an MPM SB2U-3 Vindicator, flown by James Marmande. This familiar plane failed to return on the morning of June 4; it disappeared during the return flight to Midway after VSMB-241 attacked the battleship Haruna.
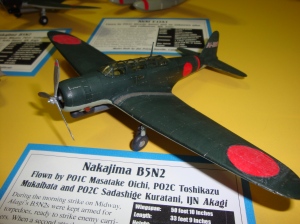
Daisuke Nakabayashi built the B5N2 commanded by Joichi Tomonaga, who led the torpedo attack on Yorktown. This plane was shot down by “Jimmy” Thach and it failed to score a hit, although two other Hiryu B5N2s did successfully torpedo the carrier.
Here’s the Zero that was well-documented in this blog. Iyozoh Fujita probably shot down four TBDs on June 4 before being downed himself by Japanese anti-aircraft fire.
Kevin James Bennett and Mark Schynert also build B5N2s; both of their planes – one from Kaga and one from Akagi – were present at the battle but never flew. They were aboard their carriers, being re-armed for the third time the morning of June 4 – when America dive bombers struck. They were destroyed along with their ships.
Controversy remains to this day about the role this E13A1 played in the Japanese fleet. Tone’s No. 4 scout was delayed on take-off by 30 minutes by a malfunctioning catapult, but poor navigation and messed-up timing may have actually helped it spot the Yorktown. Jim Priete built this Hasegawa kit.
Then we have the Wildcats – a mess of them, all built from the Hasegawa kit. Ed Ingersoll of Florida built Thach’s plane from the morning escort of VT-3 – he downed three Zeros, and later shot down a B5N2 during the torpedo attack on Yorktown.
Laramie Wright did Marion Carl’s F4F-3 using the Quickboost wing conversion.
I built Tom Cheek’s VF-3 Wildcat in 2002. Cheek scored one confirmed victories, and possibly two more, over the Japanese fleet, and may have been the only person to see all three Japanese carriers hit.
Mark Rezac built Bill Leonard’s VF-3 Wildcat; Leonard claimed a victory during the Japanese torpedo attack.
John Carr built “Pat” Mitchell’s F4F-4; Mitchell and his 10 fighters were victims of Ring’s navigation and all 10 had to ditch. Seven of the pilots were eventually rescued.
Here’s Beverly Reid’s VF-6 machine, built by Laramie Wright. Reid was another enlisted pilot who scored a kill during the battle.
Laramie also fought a battle to the death with Special Hobby’s F2A-3 Buffalo. His model depicts William Humberd’s VMF-211 plane; Humberd survived the fight between Japanese Zeroes and Buffalos over Midway, putting him among a select few.
And finally, two views of John Ferdico’s awesome Airfix TBD-1 Devastator. John built the plane of John Waldron, who broke away from the rest of the Hornet Air Group and attacked the Japanese carriers alone, losing every plane in the process.
The display is in the Doolittle Raid Room aboard Hornet – it’s much more impressive in person than in pictures!


