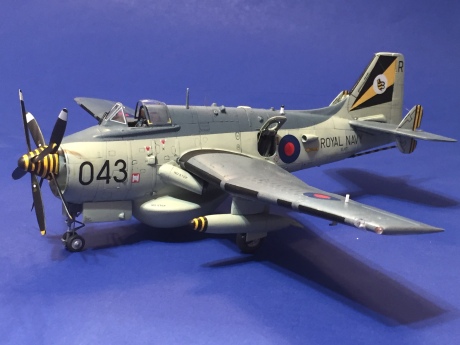
When last we left off, the Gannet AEW.3 was ready for decals. But there was a catch: the markings in the kit for XL471 are for 1977 – after the plane had stopped flying from Ark Royal. The black and white stripes on the finlet are too few in number and the B-flight marking hugs the tail leading edge where it should not. I wanted the 1975 markings from the Gannet AEW.3’s last carrier deployment. Print Scale Decals’ sheet for the Gannet includes 1975-era markings, so I used them instead.
The decals are a bit thick, but they behave themselves once they’re on the model. Decalling was nearly drama-free with the exception of some of Sword’s beautiful data markings, which desperately wanted to fold over on themselves. I used photos of XL471 to place the markings appropriately – every one of these planes was marked differently, the photos show – and discarded some of Sword’s tiniest markings because they looked like scratches in the paint instead of stencils. I also used black decal trim film to create the non-skid walkways and the deicer boots on the leading edges of the wings.
Print Scale provided the outlines of the vertical fin and finlet deicers as decals – a nice touch, if you can deal with the stress of applying these thin decals. I also added a strip of black decal to the leading edge of the vertical fin.

All the major markings on the model, minus the leading edge de-icers.
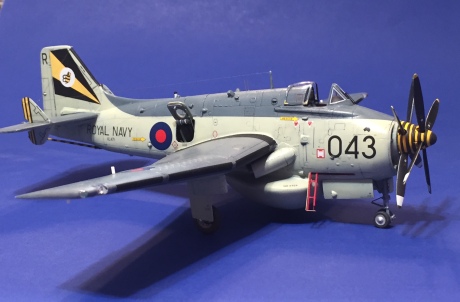
With the decals in place, I applied a fresh coat of Future and, once it was dry, gave the model a sludge-wash with a mixture of dish soap and Payne’s gray watercolor paint. When the excess wash was removed, I added some small fluid leaks using a .005 rapidograph pen. I identified areas where fluid might leak and applied a few small dots at corners of panels or behind or below hinges. Before the ink dried, I smeared it backward with my fingertip. If the effect isn’t what you want, you can remove it with water on a cotton swab and try again. The key is to not over-do it – a few leaks are one thing, but consistent leaks over the entire model would indicate a poorly-maintained aircraft and would look wrong.
I flat-coated the model with two coats of heavily-thinned Testors Dullcote, which gave the model a mostly-flat appearance but kept a bit of shine, just as a well-maintained finish would show in real life. The leading edge de-icers and walkways were sprayed with a much less thinned mixture of Dullcote to totally deaden the shine in these areas.
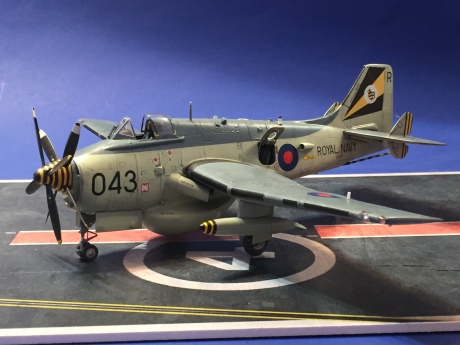
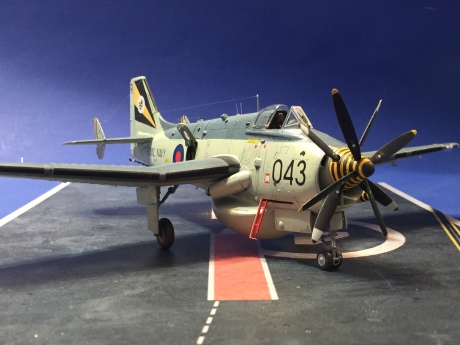
The propellers were painted next. A note to the personnel of the Fleet Air Arm: could you have just painted these things in a standard way? Nearly every photo I found had different colors (white or yellow) applied in different places (stripes, tips) and in different widths. I settled on a combination of yellow tips for the front propeller and broader white stripes for the rear propeller. The painted props were brushed with Future and received their small decals from the Sword sheet. Take care to mount the props in the spinners first, though – the decals should be in the same place on each blade, but without the spinners you’ll miss the fact that much of the base of the rear props is contained in the spinner. The decal goes outside of that, and then you can use the rear propeller to line up the decals on the front propeller.
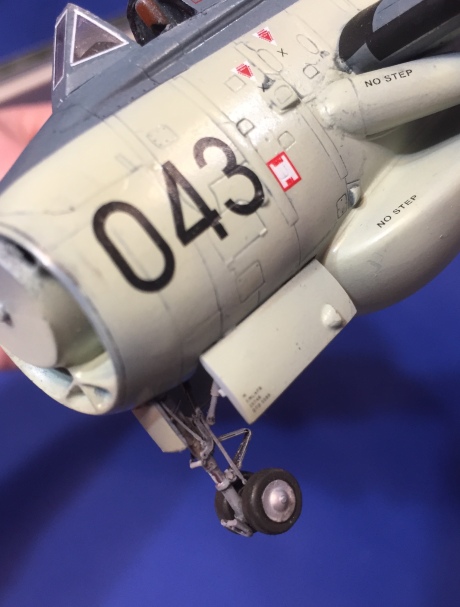
I painted the spinners, the tailhook and the front of one drop tank white, followed by yellow. The single drop tank was done for a reason: in my research, I discovered that Gannet AEW.3s would often fly with one tank and pylon, on the left side, because the tank would blank out the AN/APS-20. No tanks provided the best coverage but limited endurance, so many times the planes would fly with a single tank in a counter-clockwise orbit, keeping the tank facing the inside of the orbit (and the fleet).
Next came the step I dreaded the most: painting the spinner stripes. The sadists in “B” Flight, who clearly hated scale modelers, applied 11 concentric yellow and black stripes to the two spinners of their Gannets. Mustering my courage, I began applying strips of cut-down Tamiya tape for curves, carefully monitoring the distance between stripes. The top of the spinner was completely masked off, since it would all be black; the black tip and last yellow stripe would be dealt with last.
After several hours of masking, I airbrushed black as lightly as possible to minimize paint creeping under the tape. After it had dried a little, I started peeling stripe after stripe and was astonished to see it had all worked out! I masked off my work and put the tip of the spinner through the appropriate sized hole in a circle template, and painted the tip (and defined the last yellow stripe at the same time). My modeling nightmare turned out not to be as bad as I’d feared! After this, the tail hook and drop tank were a breeze.

The painted spinner, with propellers. You are getting sleepy… sleepy…
The canopy came from the Sword aftermarket kit. I cut the vacuformed canopy off the carrier sheet and removed the windscreen, then dipped it in Future and allowed it to dry. Later, I masked it, painted it black and then EDSG, and added the yellow “cut here” markings from the Sword decal sheet. It received a second dip and was set aside for final assembly. The Print Scale sheet also included two very thin parallel white line decals; I used them to replicate the seals around the windscreen panels. I could measure the perimeter of each pane and cut two identical pieces, which were transferred to the windscreen and then given a coat of Future to seal them in place (decals can’t grip bare transparent plastic very well). It took 10 tiny strips to finish the windscreen. Once they were dried, I used scenic glue to install the tiny photoetched windshield wiper included on the kit’s photoetched fret.
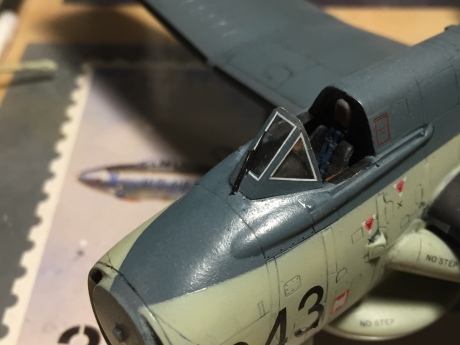
The white decal strips neatly replicated the windshield seal, and the wiper came from the kit.
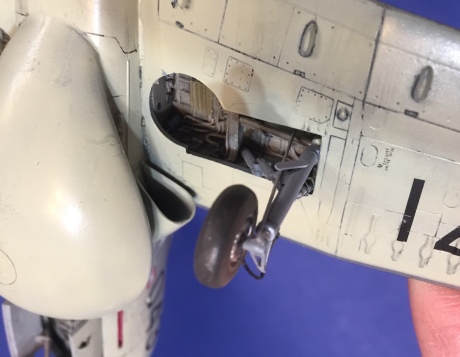
Nothing from here could progress until the plane was on its landing gear. The main gear were notable for their lack of axles – there was nothing for the wheels to fit on to! I drilled holes into the main gear where the axles should be, and then used Albion Alloys tubing to make new axles – which I fit into the wheels. I found it easier to add the axles to the struts on the finished model than to slip the wheels onto the axles. The main mounts we cleaned up and I removed the anti-torque scissors with a motor tool. These were replaced by photo-etched parts from Eduard intended for the Gannet ASW.2. Photoetched brass tie-downs, painted solder brake lines, and other small details were added to the struts, which were finally outfitted with a small placard decal swiped from a Hasegawa weapons set.

One right, one left. The placards read, “if you can read this, put down my damn model!”
The nose gear was much more complex. I removed the single retraction strut and the anti-torque scissors and removed the mold lines by scraping them with a No. 11 blade. Then, I started adding bits from the Eduard set, including attachment points for the two retraction struts. These struts interfaced with the front hinges of the nose gear doors – so I had to fashion new hinges from strip styrene for the doors as well. The struts were made from two lengths of telescoping Albion Alloys brass tubing, which would allow me to adjust their lengths during final assembly. I also re-made the towing bracket on the front of the gear and added the shrink struts and other details to complete a rather complex set of landing gear.

The nose gear, before the application of paint.
The nose gear plugged into a nice hole in the nose well bay, but the mains fit poorly into odd box-shaped holes on the outer sides of the wheel bays. Their retraction struts also rested on a raised ledge on the forward walls of the bays. These two things made mounting the main gear a challenge, which was only overcome by patience and careful application of CA glue.
The right main gear installed, with the shrink strut added.
I painted the wheels and tires as I usually do, but I applied a lesson I learned building an Airfix M6 bomb service truck. After painting the tires an appropriate dark gray-brown, I applied pastels ranging from black to brown to them. This weathered the tires, but it also made them dead flat – exactly as worn rubber should appear. The wheels were joined to the struts – some adjustment was needed to the both nose wheels in contact with the ground – and with that the model was on its gear.
The nose wheel. with the retraction struts anchored to the door hinges.
Next, the various antennas were removed from the sprues, cleaned up, and CA-glued to a popsicle stick for painting. The CA adheres well enough for painting, but the parts can still be easily detached. They were then added using photos as a guide. The pitot sensor is not called out in the instructions – it goes below the outer left wing.
One of the sensors on the belly of the machine was revealed in photos to be a round, hollow cylinder with a tube inside of it; the kit part was much simplified, so I drilled it out and added the internal tube from a bit of solder. After it was painted and added, it’s barely visible – but it’s a neat detail!
The landing light bays were painted gray and fitted with an MV lens of the proper size. A small “wire” was added from fine solder, and the covers were cut from clear packing tape. These were cut slightly oversized and adhered on their own; any overlap of the painted areas was carefully brushed with Dullcote to eliminate its shine.
Gear doors came next. The mains were butt-joined to the lower wing at the edge of the wheel wells; the nose gear doors went into place and had the nose gear retraction struts extended to the front hinges. A painless process!
The pylons and tank were added next. I had to adjust the profile of the lower edge of the pylons to allow the tank to sit at the appropriate angle; they were then CA-glued to the wings. Since there were no attachment points, I was careful to get them aligned. The tailhook went into place with no fuss at all.
I un-masked the boarding ladder recess and set about making a ladder. The ladder cover folded over to form the lower rung of the ladder; the outer side of the ladder folded up and had an extension to reach the lower rung. The cover was made from .005 styrene, while the rest of the ladder was very carefully assembled from .020 by .020 styrene. The extension was made of wire. It was painted, assembled and added to the model with a shocking lack of hassle.

The boarding ladder is a small but colorful detail and was shockingly easy to make.
The AEW.3 had two different aerial arrangements, early and late. Naturally, the late arrangement was the weirdest. The antennas were suspended between the top of the tail and antenna masts on the fuselage spine by springs mounted on the inside of the finlets. I made mounting plates for the finlets from .005 styrene and drilled holes to mount tiny lengths of .006 acupuncture needles, which would double as my springs. I also drilled a hole in the tippy top of the leading edge of the vertical fin and added a small bit of metal rod as the mast. I tweezed a fiber from a pair of black panty hose and, using CA glue, tweezers and a lot of care, strung it from post to spring to tail to spring to post.
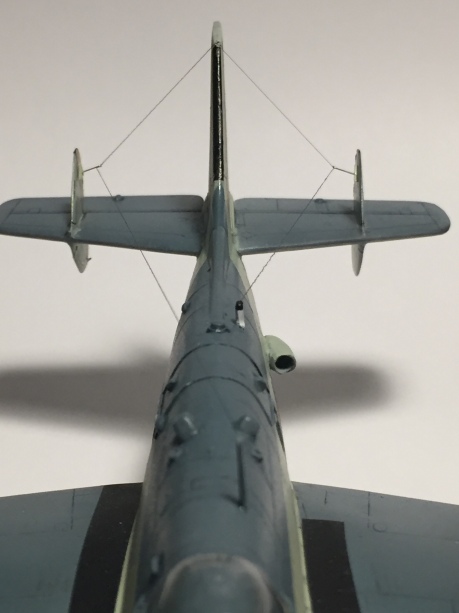
Asymmetrical installation. of UHF aerials, with the “springs” on the finlets clearly visible.
The radar observers’ doors came from the resin set for the radar compartment, but I found the interior detail lacking. It was sanded off and I replaced it with fine solder, styrene and photoetched bits. I also used Apoxy-Scuplt to mold the roll-up blinds used to blank off the windows in the daytime so the operators could see their screens; straps were made with flattened fine solder. After these were painted they were added to the top of the doors’ interiors.
The kit door windows are domed on the outside but are flat on the inside. Thoughtfully, Sword provided replacements in vacuformed plastic that are true domes inside and outside. Somehow, I managed to throw mine away after cutting the windscreen off the clear carrier and I found them only after going through my workshop trash can item by item, CSI-style. That was one problem solved. Then I had to cut these domes out and get their tiny circumferences round. Once that was done, I dropped one of them on the floor and spent 20 minutes trying to find it. Upon its location, it was immediately adhered to the window opening with Future, which sticks well and doesn’t mar clear parts.

Domes on, and handles yet to come. Here, the doors have nearly been crushed by a quarter.
Tiny bits of .020 styrene rod were placed on the inside and outside of the doors, and photoetched handles (sourced from random bits of photoetched sheets intended for P-51Ds!) were carefully added. The doors themselves were CA-glued in place, along with a brass support rod.

The radar observer’s compartment door, detailed and in place.
Next, I substituted .020 by .040 styrene strip for the four outer wing antenna provided in the kit as photoetched parts. I used Dullcote as the adhesive and left the plastic white to match the real items. These antennas seen to have been located strategically so future modelers could knock them off!
The final step was to apply that crazy propeller and spinner. And with that, it was done – what I hope is an attractive model of a rather homely airplane! I learned a lot building the Gannet AEW.3 – the Sword kit is good but leaves a lot of areas to the modeler to detail. If you have references and patience, you can fully flex your modeling skills on the AEW.3!